A
little yard work. That's what she called it. "Do you think
you could do a little yard work for me this summer, Sweetie?
You've been working on that motorcycle for months and months now.
Can you take a break from it and do a few things outside?
The weather is turning nice. It'll be fun..." Bonnie
was trying to engage my enthusiasm.
The
assignment sounded innocent. We have an area outside our garages
that is paved with brick, and it was bordered with railroad tie
retaining walls on two sides. The ties were settling and
shifting, and generally looking ratty. "Can you straighten these
up and make it look better?" she said, innocently.
I
mulled over the
challenge. It really did need to be done, but on the other hand I
knew it was not a small job. I had put those tie walls in twenty
years before, and I knew that they went probably six courses below
grade in places, in addition to the two showing above. It was
originally a true retaining wall with about a three-foot step in grade,
but I had eventually bermed up most of the low side, partly to shore
the wall, and partly to keep the sand bed under the bricks from washing
out between the ties. "Maybe I
can just take the top two courses off and line everything back up," I
told myself, hopefully.
The next Saturday, the weather was
really nice for working outside, so I rolled the in-progress 1971
Triumph Daytona motorcycle over to one side of my shop to clear a
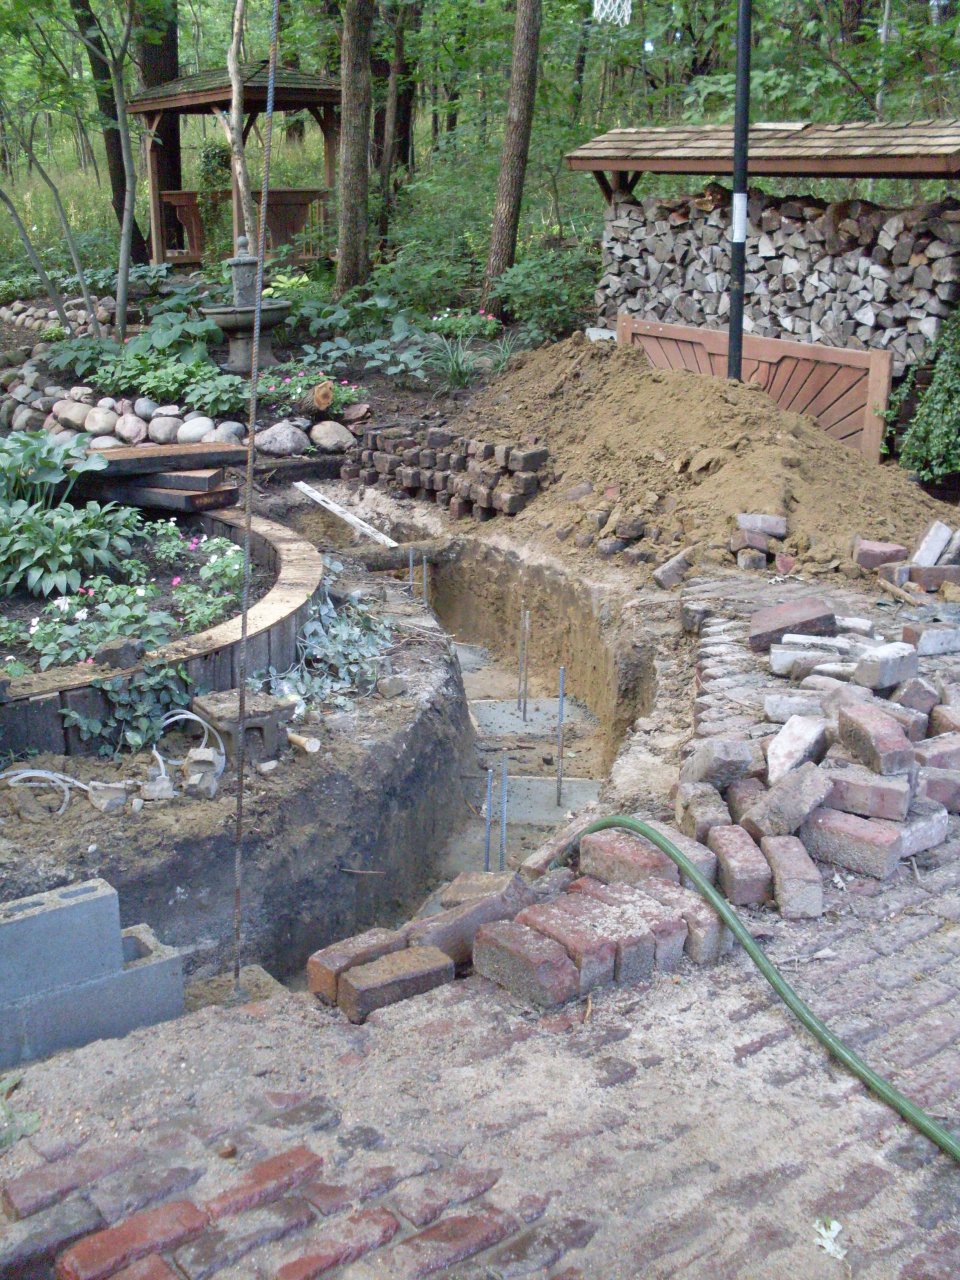
traffic lane for tool trips. I pulled up the paving bricks a foot
or two back from the west side tie wall. The top ties had
been shoved at least eight inches out of line in places, and were
leaning outward.
 I
knew the ties were all spiked together with 3/8" x 10" spikes, so it
wasn't going to as easy as just rolling the ties off the wall. I
brought out my biggest pry bar out to see if I could pry one of the top
ties off. I put the toe of the bar between the courses and gave a
little test push. I felt the momentary joy of virtually unopposed
effort as the top tie easily lifted up. Then I realized what it
meant: the next tie down, and maybe all of them, were rotted to
the point of uselessness. That's why the top course was out of
place--there was nothing holding it in place.
I
knew the ties were all spiked together with 3/8" x 10" spikes, so it
wasn't going to as easy as just rolling the ties off the wall. I
brought out my biggest pry bar out to see if I could pry one of the top
ties off. I put the toe of the bar between the courses and gave a
little test push. I felt the momentary joy of virtually unopposed
effort as the top tie easily lifted up. Then I realized what it
meant: the next tie down, and maybe all of them, were rotted to
the point of uselessness. That's why the top course was out of
place--there was nothing holding it in place.
I got the top
course off, and surveyed what was left of the ties below. I
yanked a couple of them out in pieces no bigger than a kitchen
spoon. Though I hadn't admitted it to myself at that point, I knew I
was going to have to take out all of the ties. The third course
down, though in more solid shape, was still quite a distance out of
position. Just the west wall is 24 feet long, by eight
courses--that's 24 ties, most of them underground.
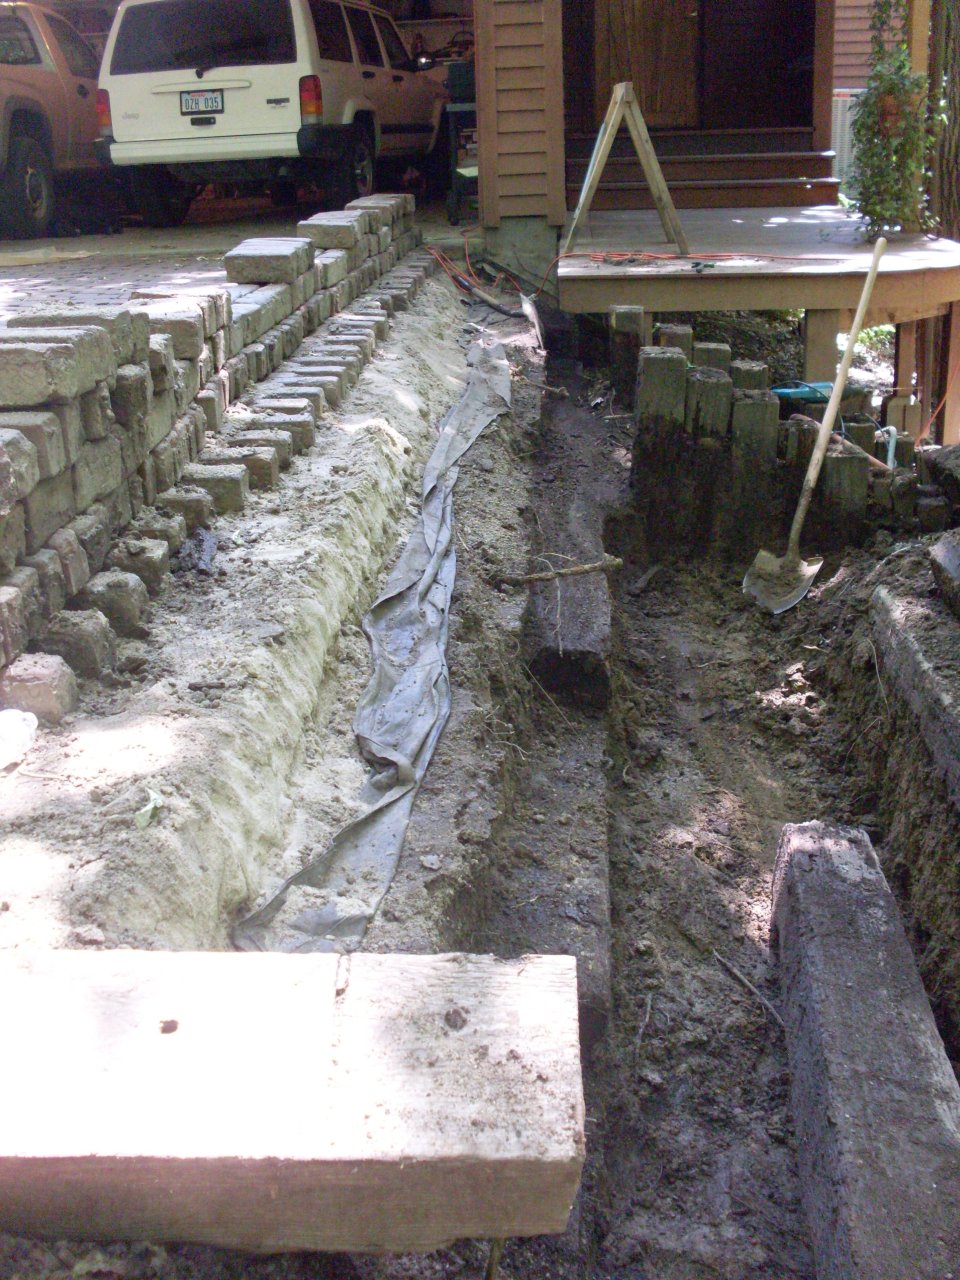
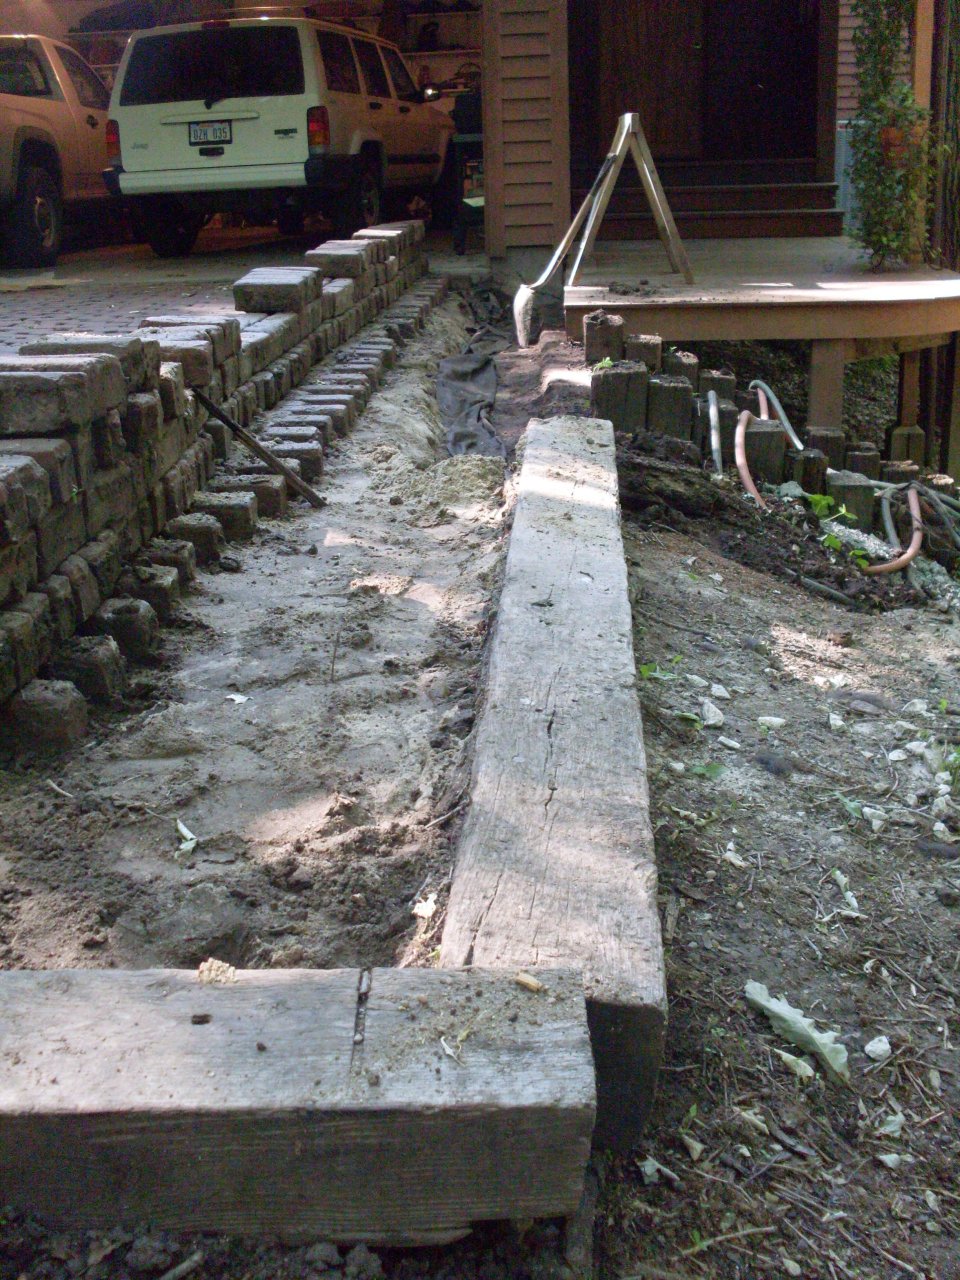
I
got about half of the ties on the west side out that day, the pace
being slowed by the necessity to dig a trench wide enough to work in.
Lying in bed that night, I struggled with the classic
do-it-yourselfer's dilemma: do I slap some new ties back in
there, button it up and call it good, or do I build a wall that will
outlast me? The prospect of spending what I knew would be a good
part of the summer on the project gave me some pause. As I slowly fell
asleep, Bonnie's words wafted through my semi-consciousness:
"It'll be fun!"
The next day, while digging out the rest
of the rotted ties, I was designing in my head. I have to be
honest--I had previously given some thought to how I would like to redo
these walls, but really only in sort of a hypothetical sense. I
was now reviewing those hypothetical plans, and adding detail to them.
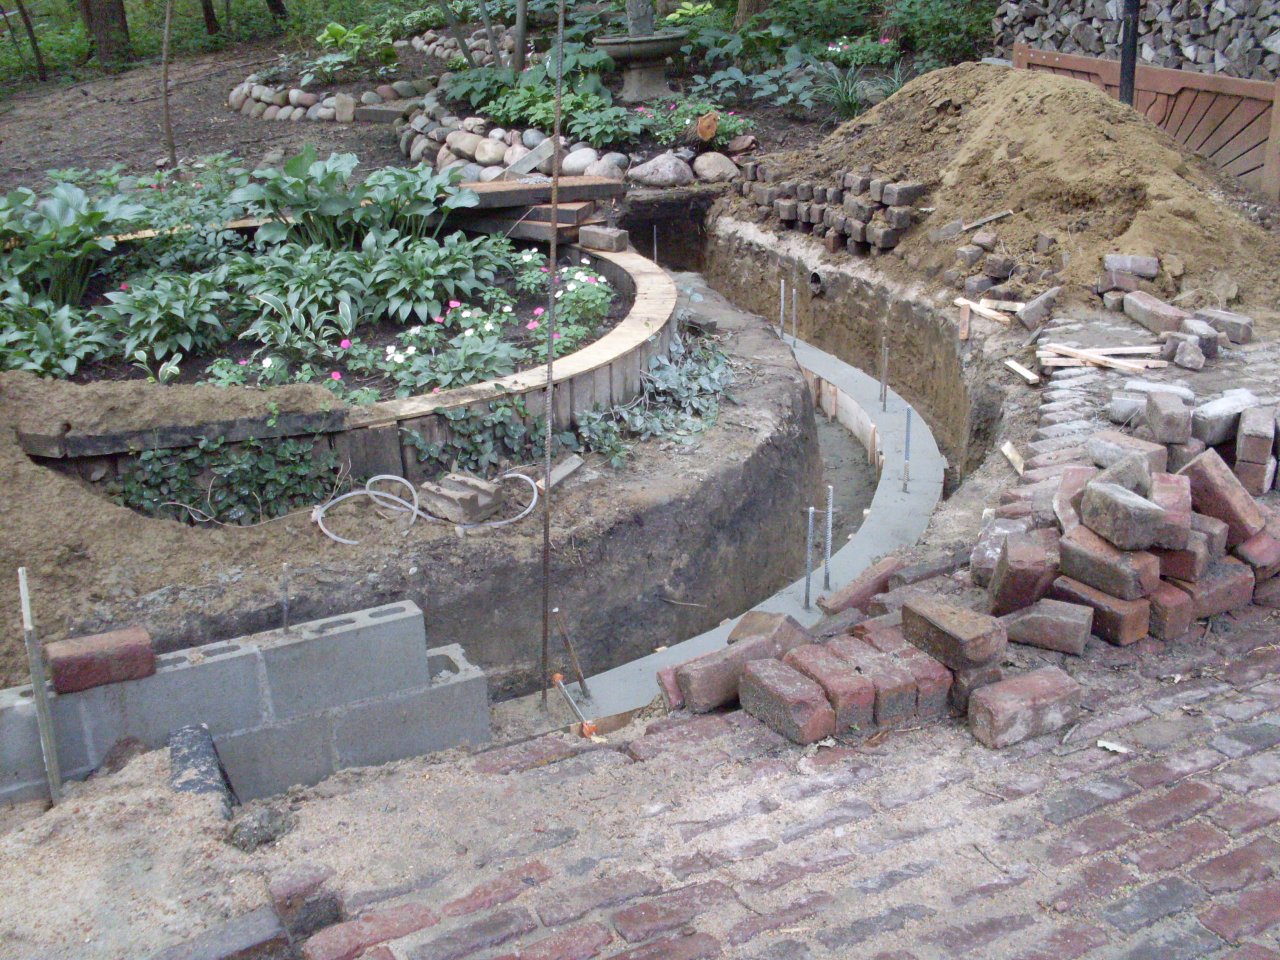
I would build a masonry wall. I'd use grade beams on spot
footings, to avoid a continuous footing pour. I'd be working by
myself, and with the difficulty of getting a concrete truck close
enough, all concrete pours would have to be limited to smaller
batches I could mix myself. I'd do concrete block for the same
reasons. With plenty of rebar and filled cores.
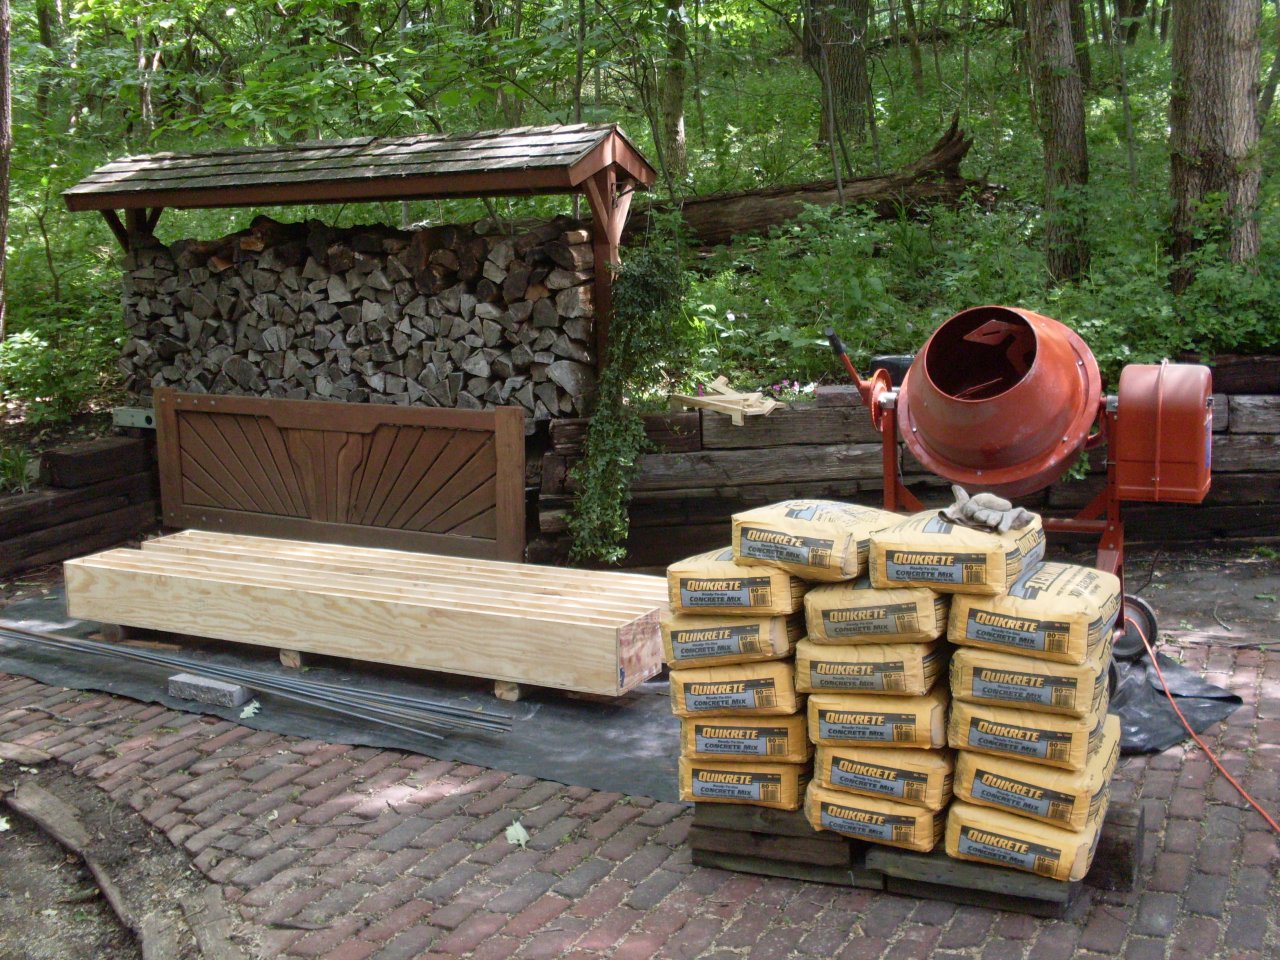
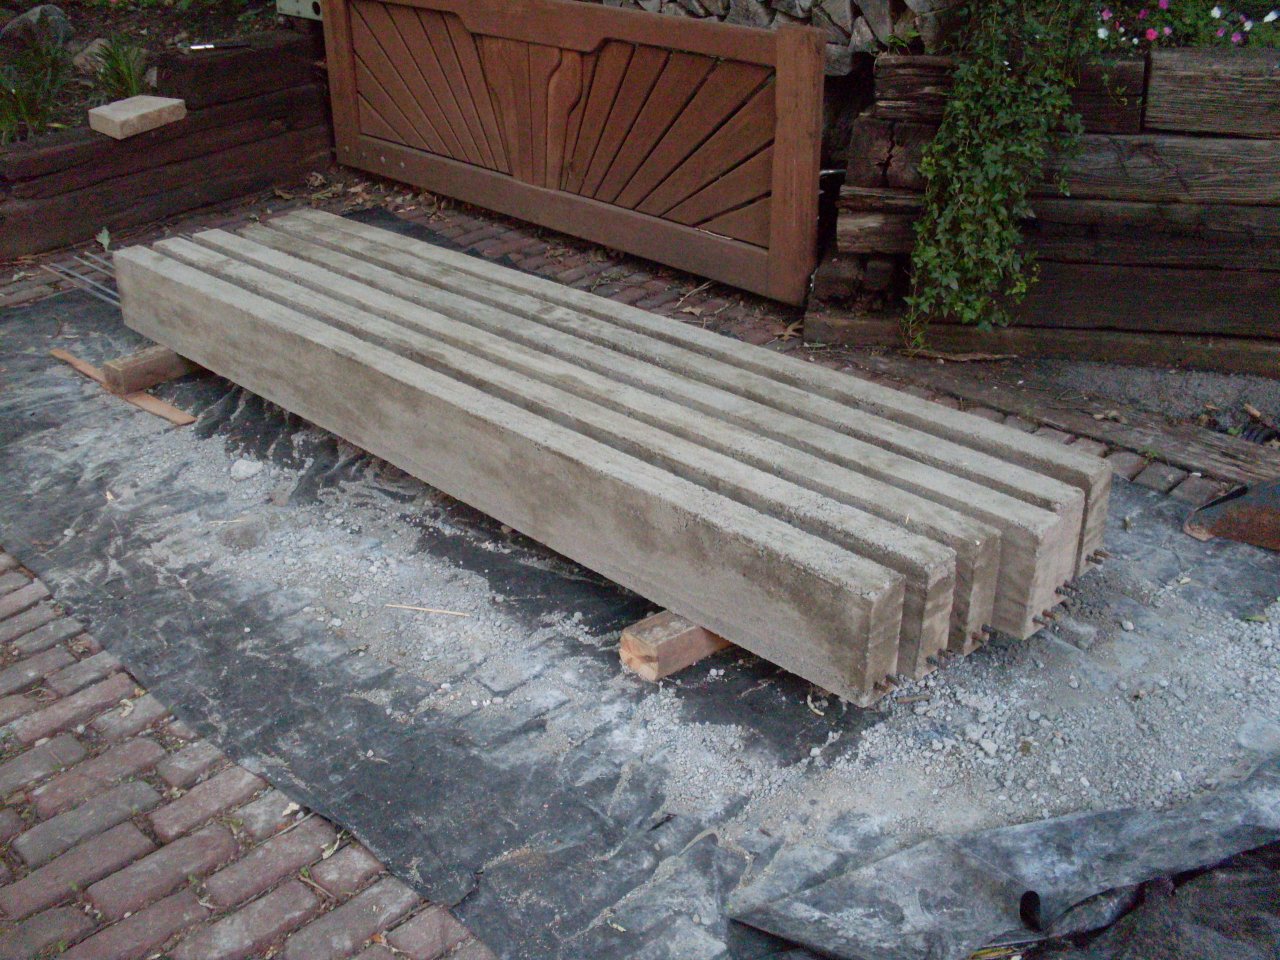
I
had planned to use precast concrete lintels for the grade beams.
I didn't anticipate the difficulty I would have finding them
locally. Undeterred by this adversity, I resolved to cast my own
grade beams. A little brushing up on some reinforced beam
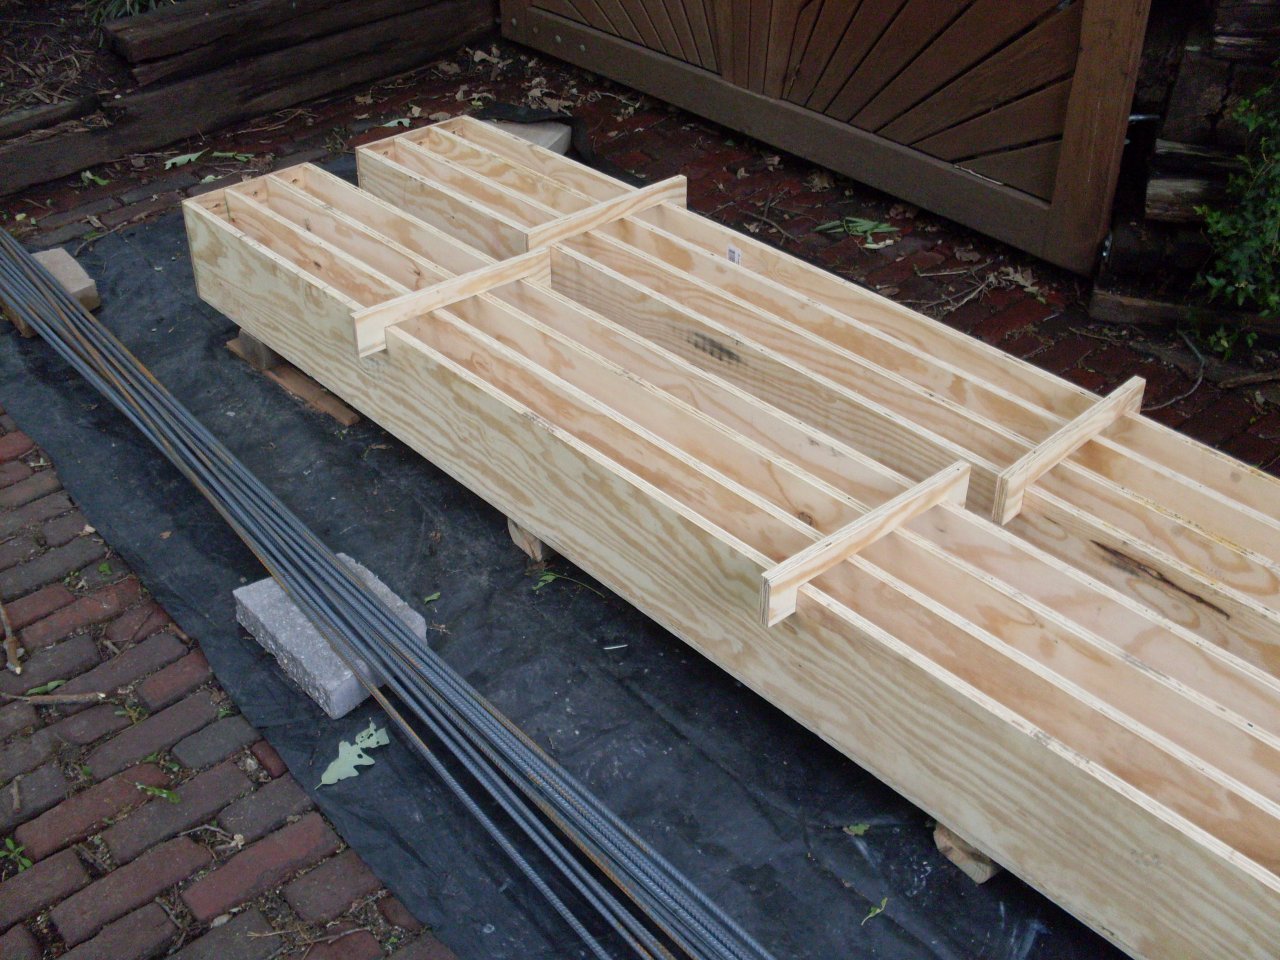
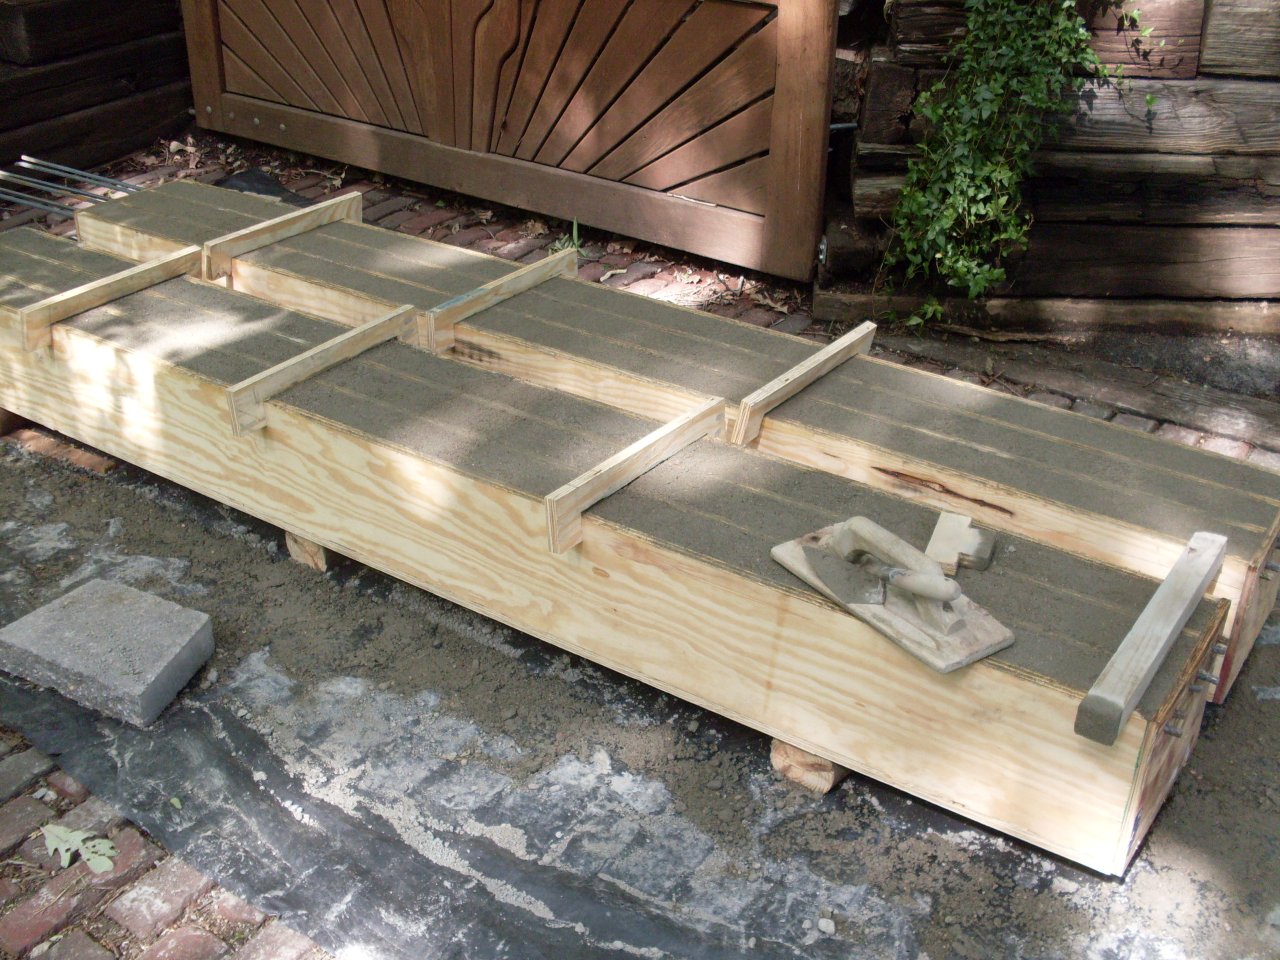
formulas, and I had a design. Each eight foot grade beam would
actually be made up of two 3" x 8" beams reinforced by two #3 rebars
near the bottom. These units would be plenty strong, and, at only
about 200 pounds apiece, not too difficult to handle. I made
forms for three pairs of 8-foot beams to span the 24-foot west side.
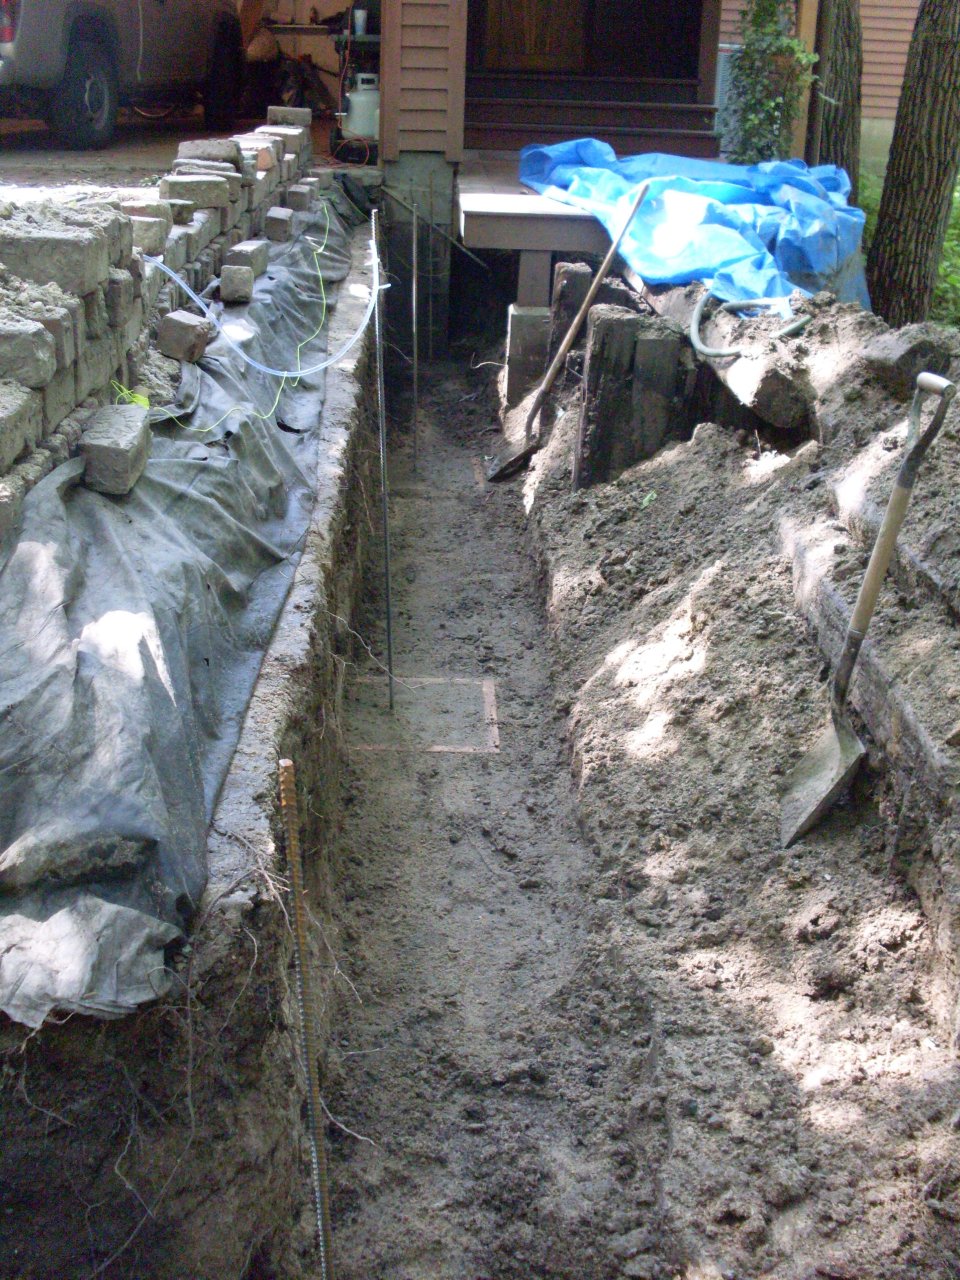
While
the beams were setting, I set to pour the four 16 x 16 x 8 reinforced
concrete footers for the beams on the west side. The bottoms of
the footers are a little over four feet form the top of the brick
pavers.
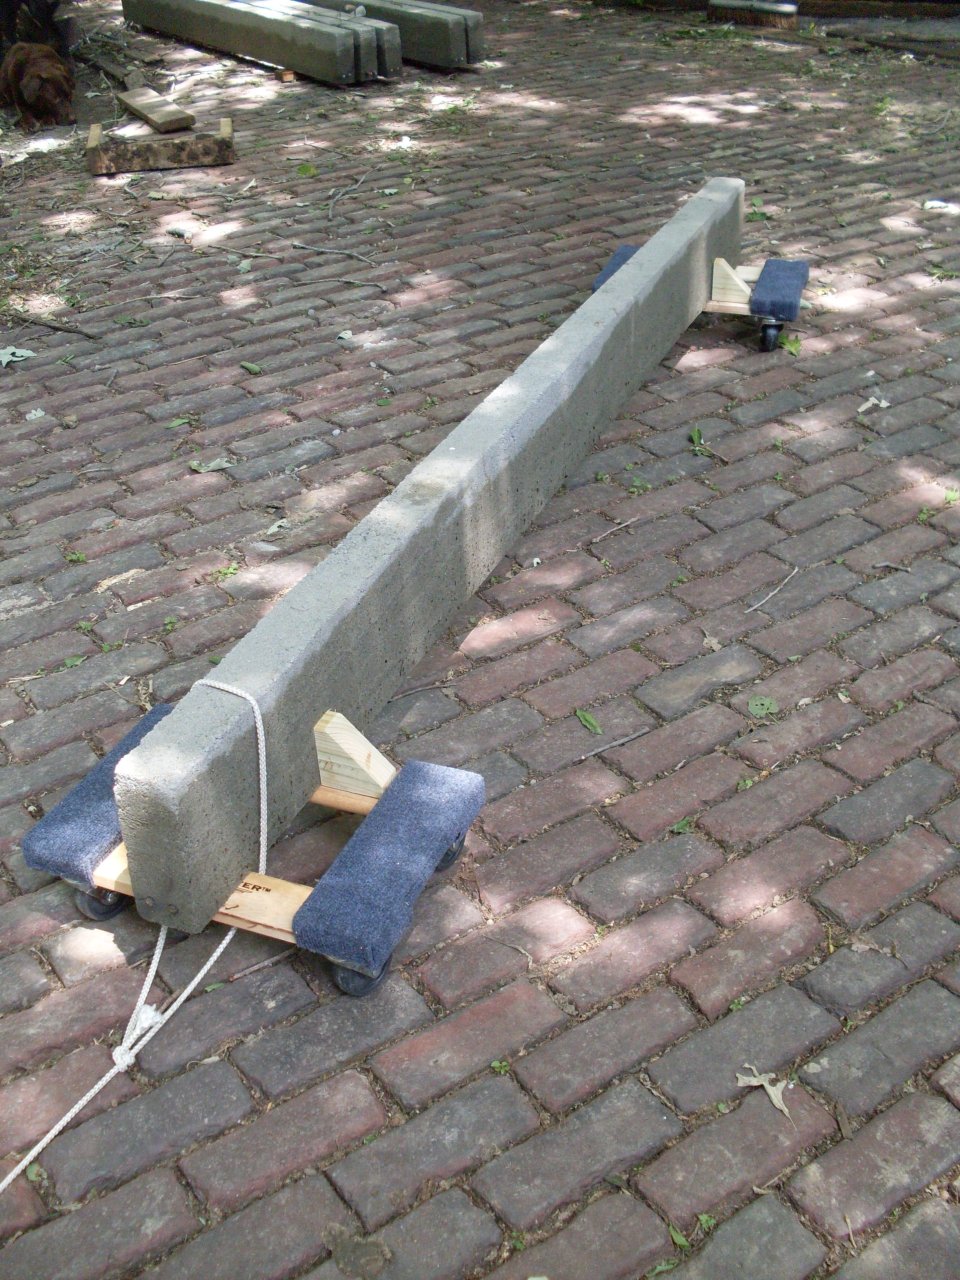
Even
though the beams weren't all that heavy, they were a little too heavy
for one person to manhandle into the bottom of the trench safely. Also, I
realized the hard way that even though the beams were very strong in
the way they would be loaded--rebar on the bottom, load on the
top--they could be very weak in some other orientations. In a
flash of real-world learning,
I quickly realized why the text books often showed a reinforcing bar in
the top of the beam, even though it offered no load-bearing strength.
I broke one of the beams in moving it when it became
high-centered and broke under its own weight, the unreinforced top of
the beam having practically no tensile strength. (The fact that the
concrete was only maybe ten days old contributed, I'm sure.)
This
meant that I had to be very careful to keep the beams upright when
moving them and placing them. I modified a couple of cheap
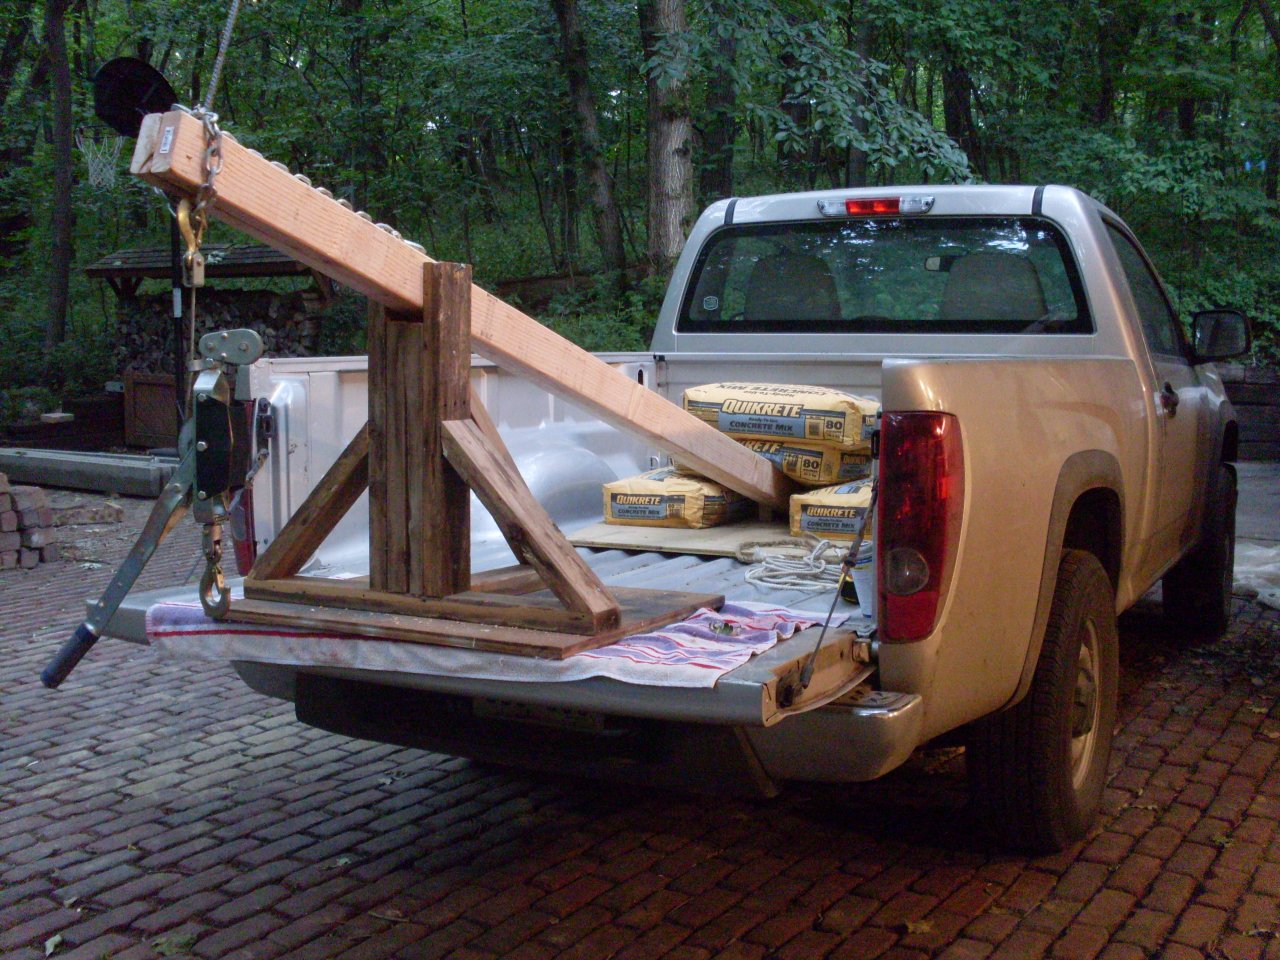
furniture dollies to help me move the beams. Since
lowering the beams was now going to be even more tricky, I rigged up a
poor-man's boom for the bed of my truck. At risk of having it
show up on some "stupid jury-rig" web sites, I show a picture of it
here. Please understand that I don't drive around like that.
With
all the beams installed (I poured the missing one in place), I wondered
if I really avoided any work over just pouring a continuous footing.
Maybe. I don't know. I did pick up the practical
knowledge about the top reinforcement in the beams, though.
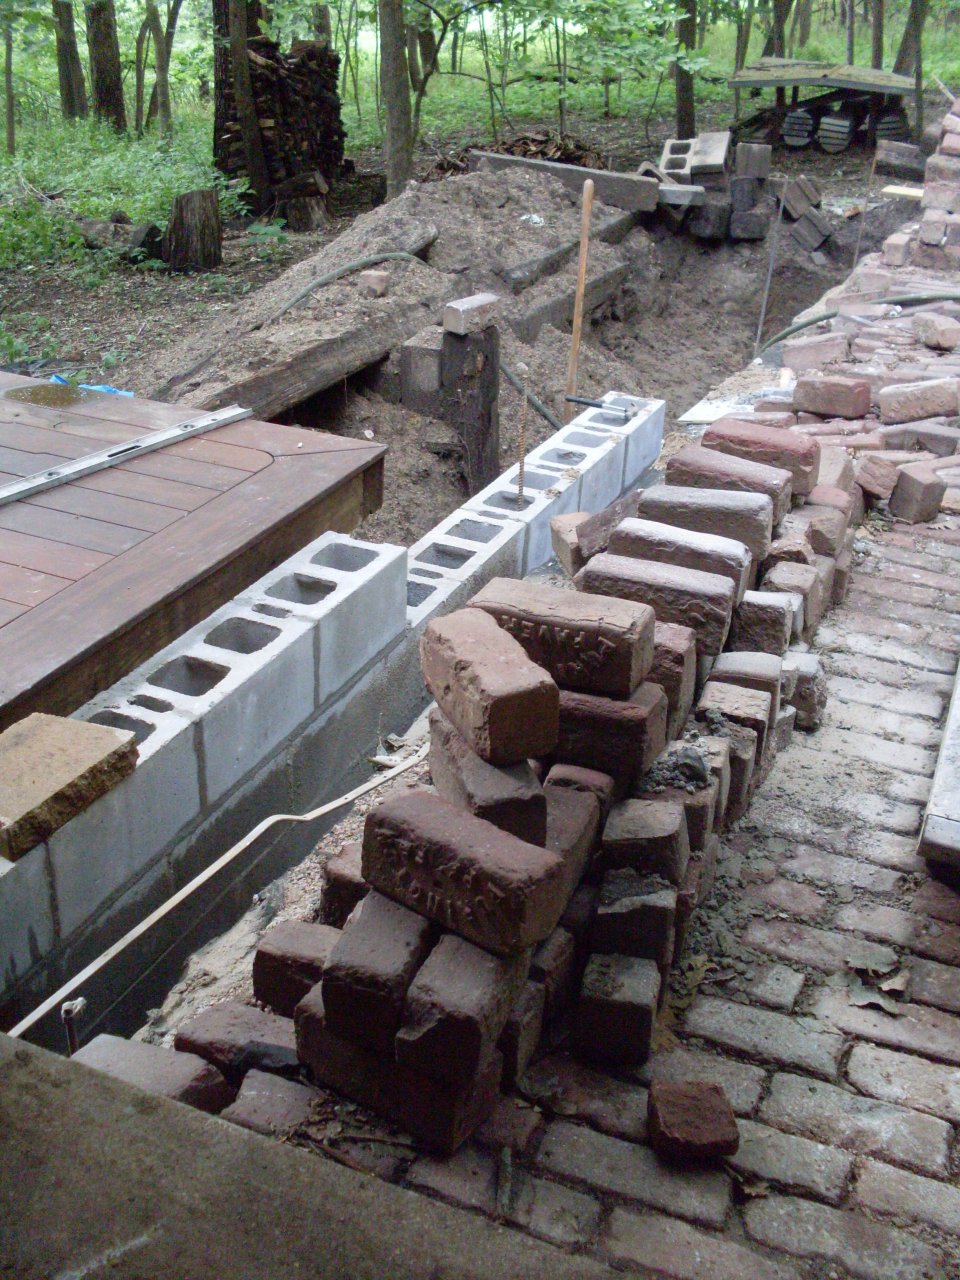
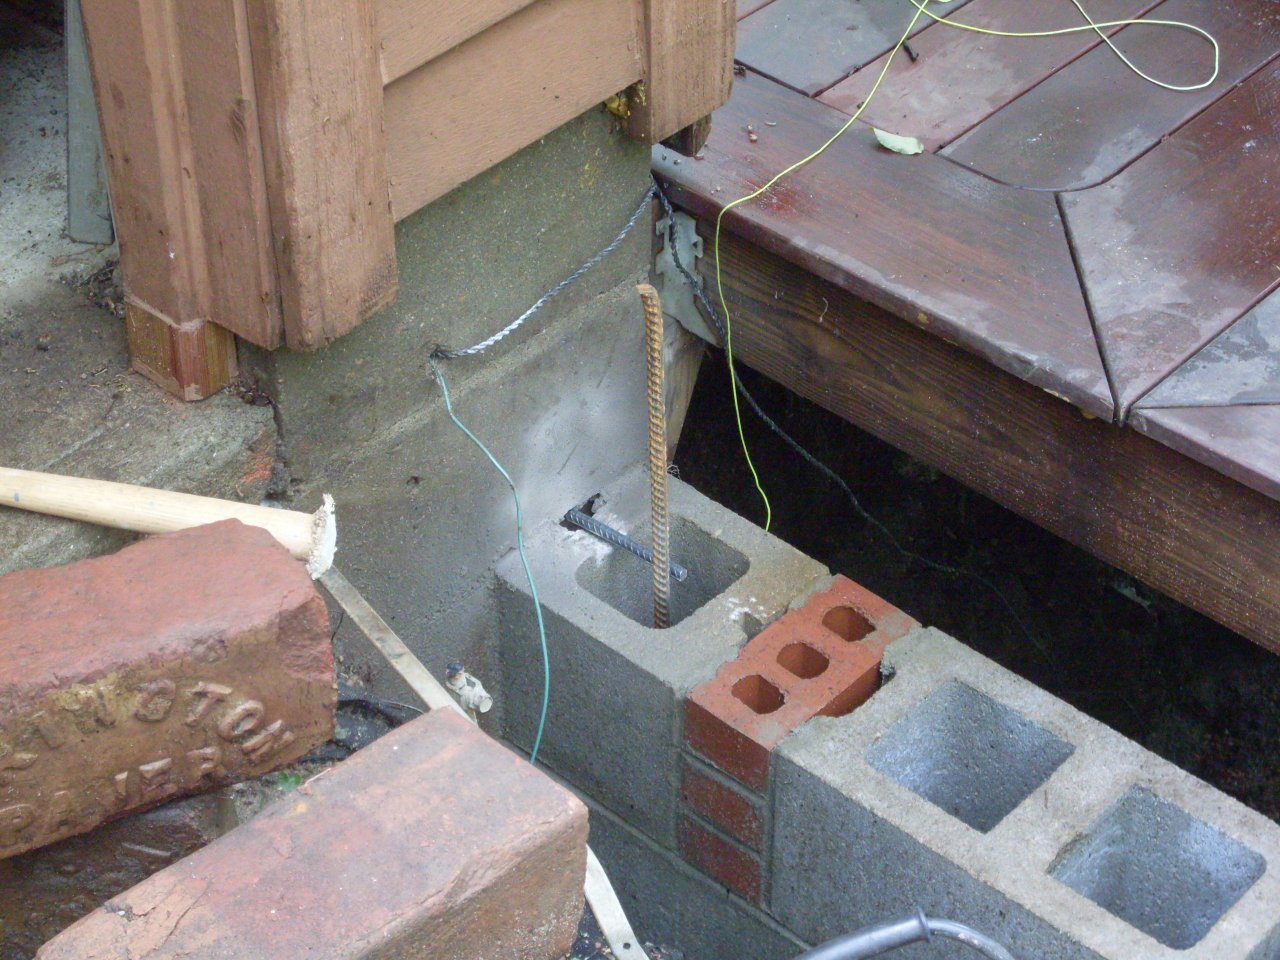
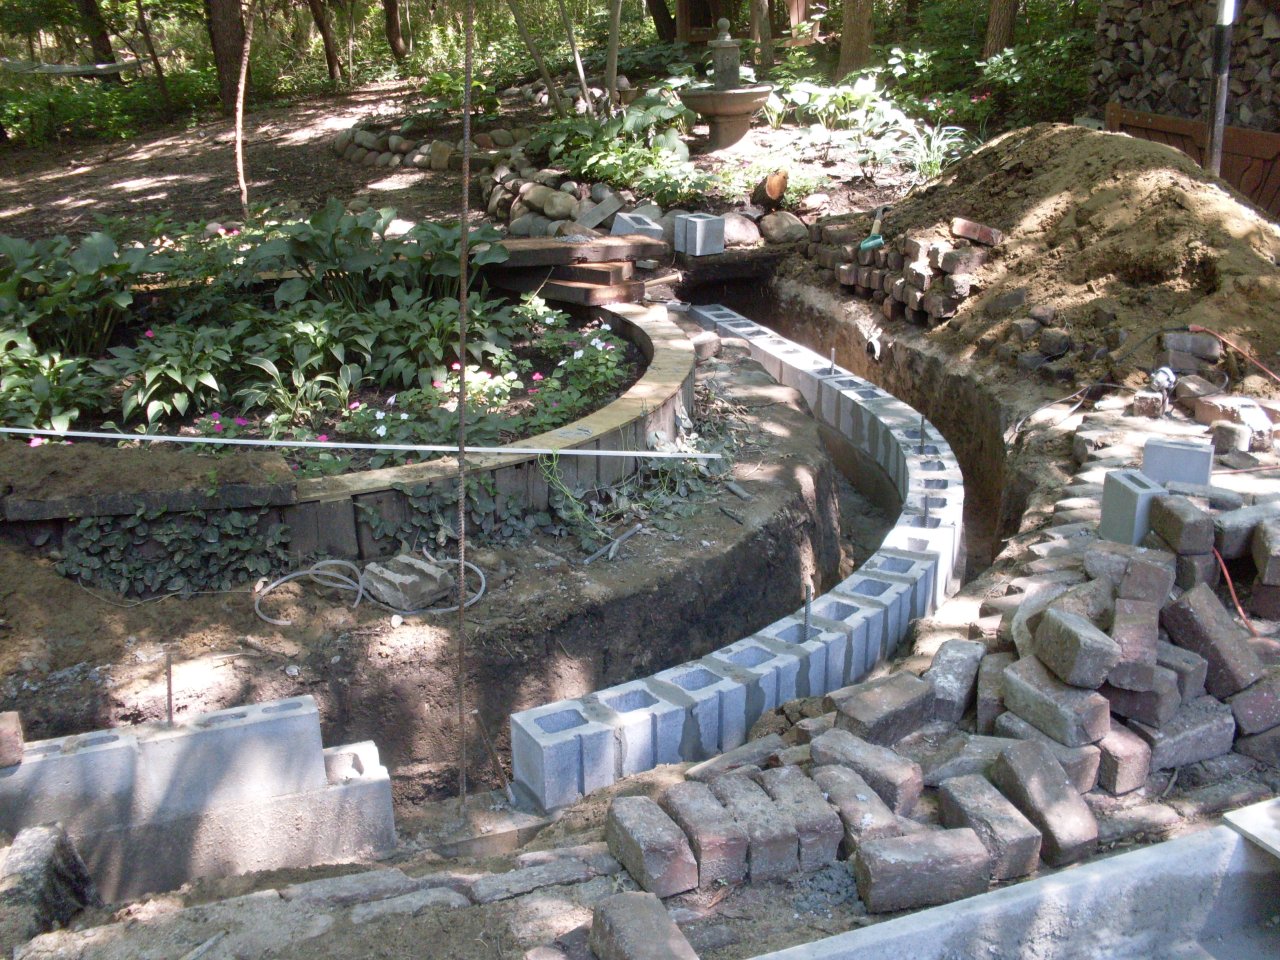
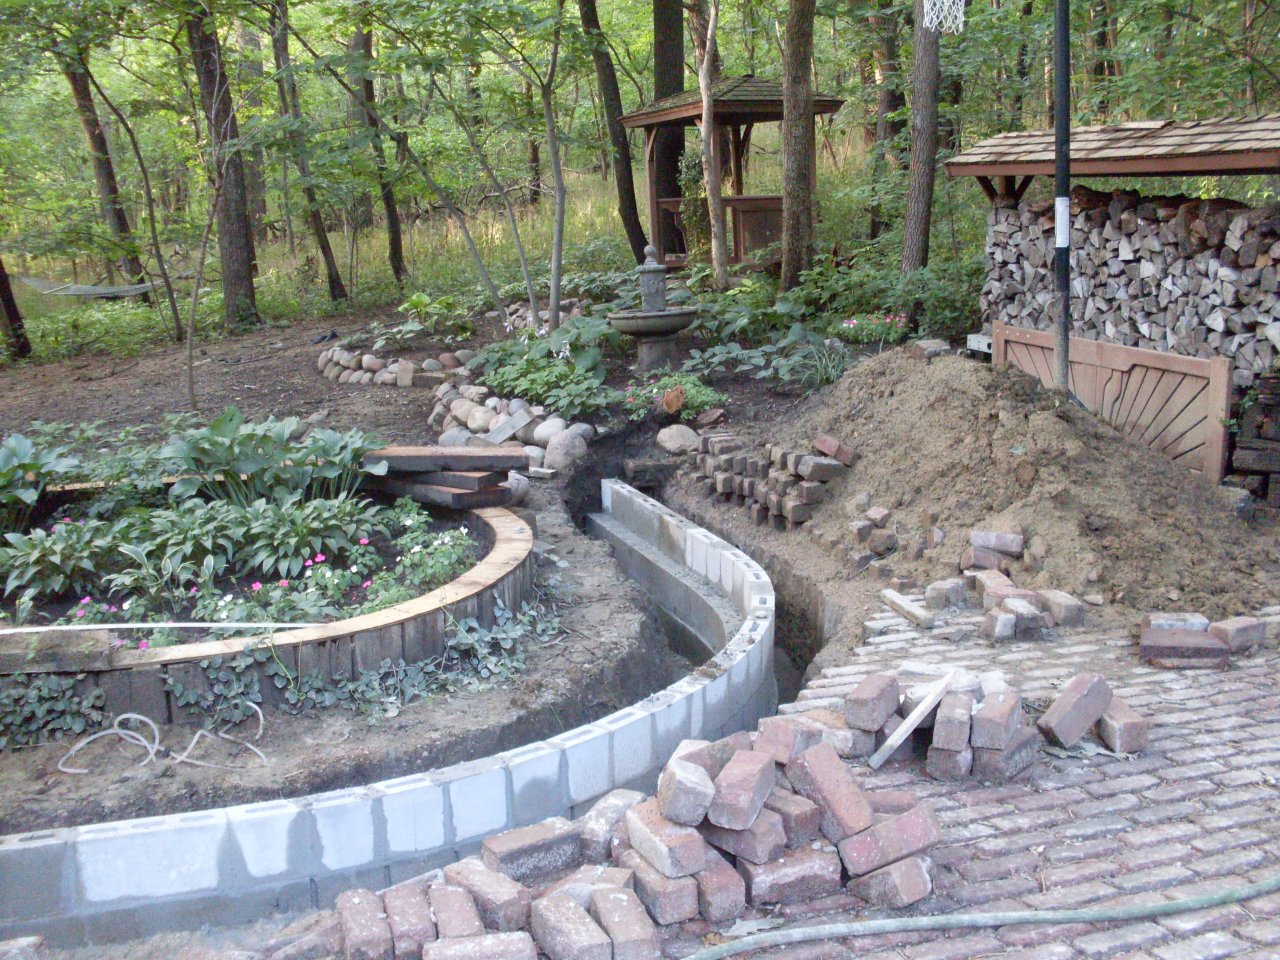
Laying
the block went OK. I inset a piece of rebar into the existing
foundation to lock the new wall in place there. The wires coming
out of the foundation are for the invisible fence that mostly keeps our two dopey
Labs from going AWOL. I set bricks in each course as spacers so that the block joints wouldn't line up
with the ends of the grade beams.
For
the north side, I still used the grade beam approach, but I poured them
in place.
I haven't really mentioned the rains. It was late
June by this time, and the rains had started almost immediately when I
started digging out the ties. May, June, and July were among the
wettest on record for our area. In June, I think it rained almost
every day. The rains washed the sand out from under the
pavers and filled the trenches. I must have dug some of them four
times.
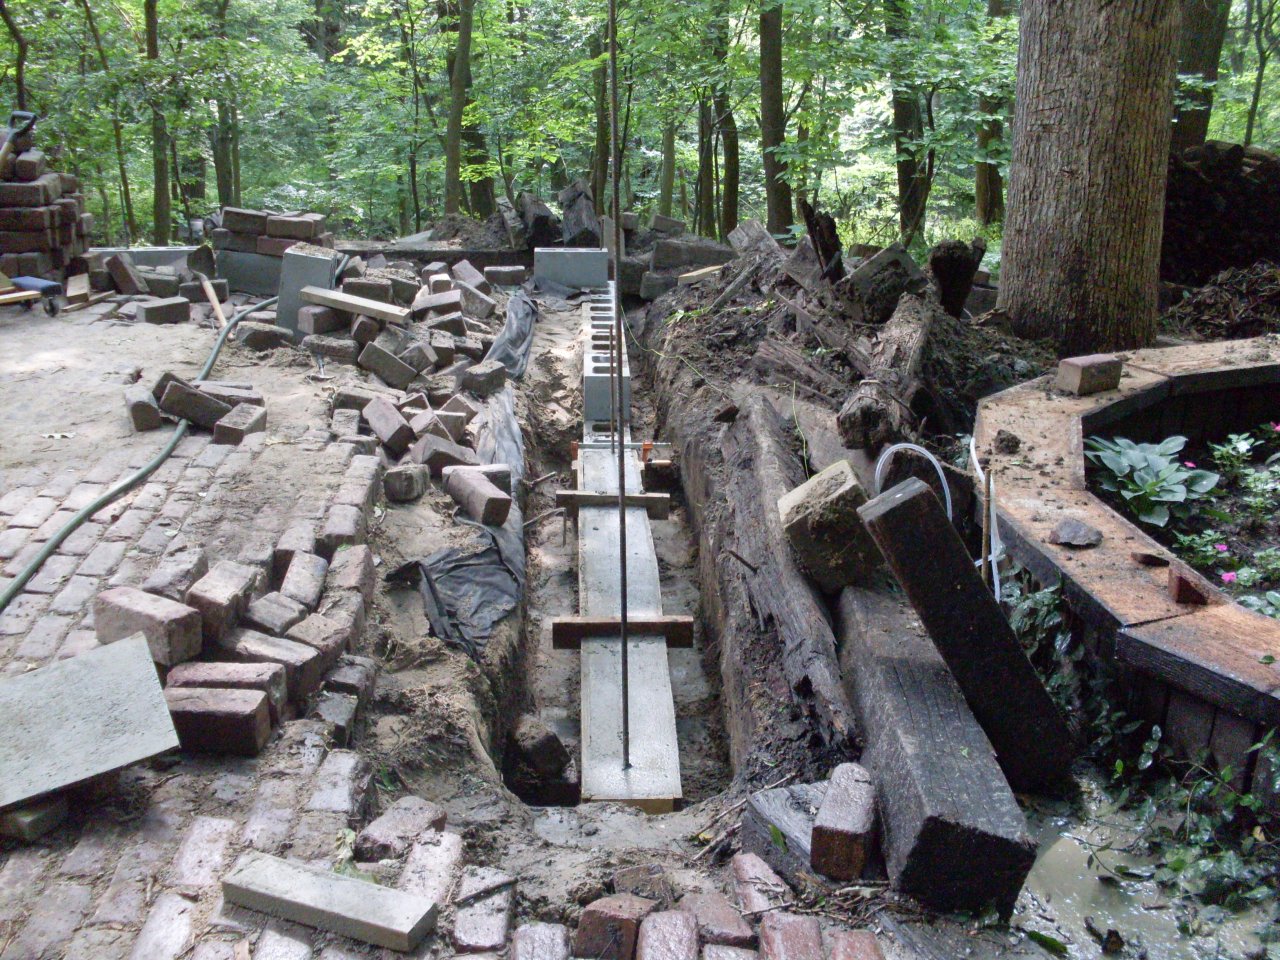
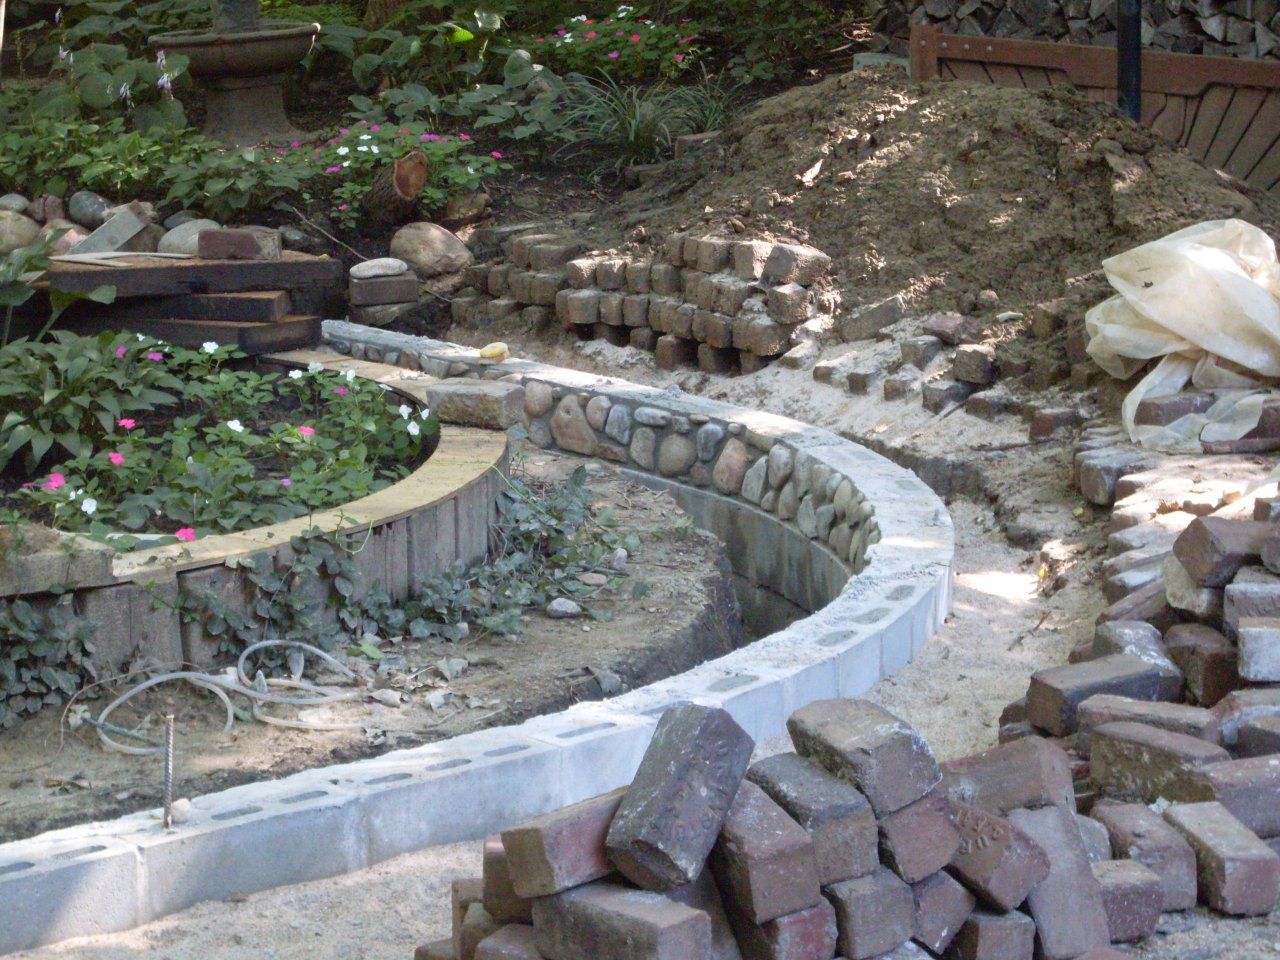
I
haven't mentioned the curve yet, either. The original north wall
connected with an 8-foot radius, 90-degree arc around a large circular
planter. The ties were pieced around the curve in about 18-inch
segments. I put five 16 x 16 x 8 point footers around the curve,
then formed and poured a reinforced curved beam on them.
Half-blocks
makes a pretty smooth curve at this radius. I actually drove a
stake in the center of the planter to pull the radius from.
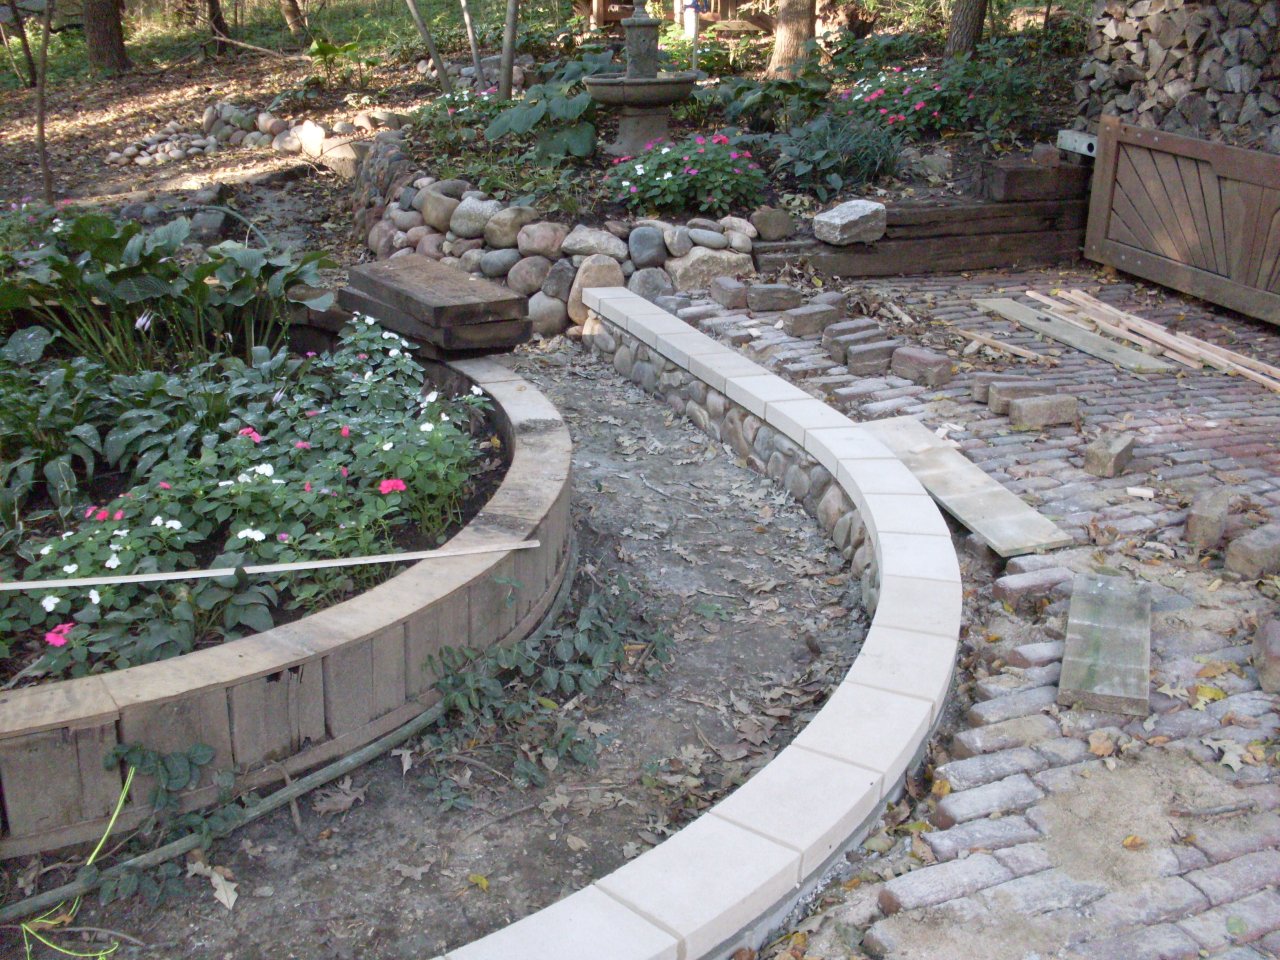
Only
the top ten or so inches of the wall will be exposed on the side away from
the pavers, so the top course of block all around was reduced to 4"
units to leave room for a natural cobble veneer. I'd done
quite a bit of concrete block work in the past, but this was my first
attempt at cobble wall work, and I learned an interesting thing.
Block or brick masonry work for me is one of those mindless jobs I can do all
day, almost mechanically. It takes so little concentration or
thought that I can really let my mind wander. The cobble work was
completely different. Even though the materials are easier
to handle, I found myself much more tired after doing the cobbles than
the same amount of time doing block. I'm sure it's that the
cobbles take so much more concentration in the choosing and fitting of
the stones. It's sort of like a jig saw puzzle with no picture, and where the fit of a piece is a matter of degree.
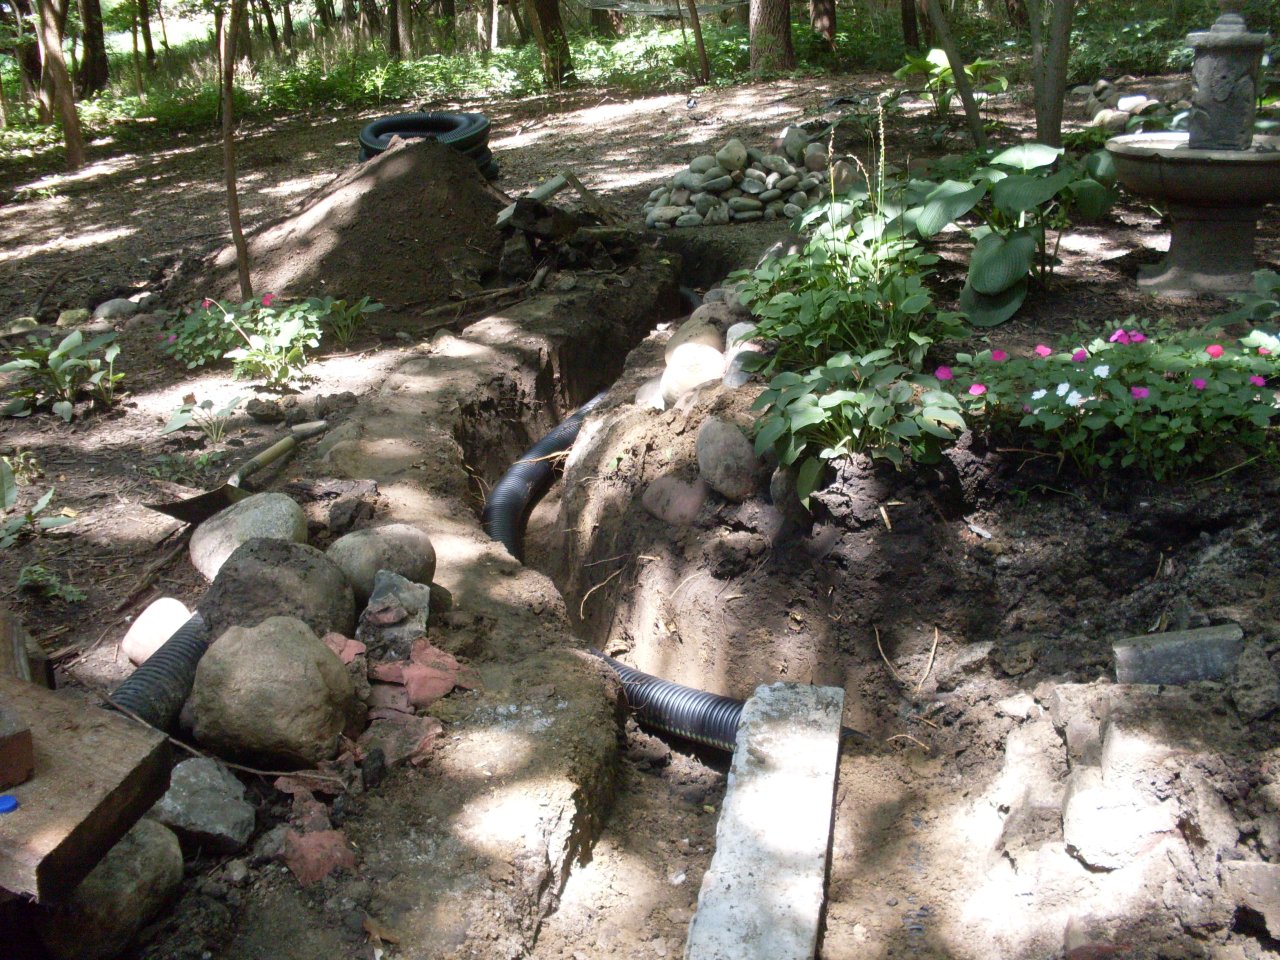
Also, in a rare instance of foresight, I put
in an irrigation main line, low voltage control cable for a sprinkler
system, and a mains power cable before backfillng. I had to
reroute a drainage pipe, too. Not sure where that one is
going to end up.

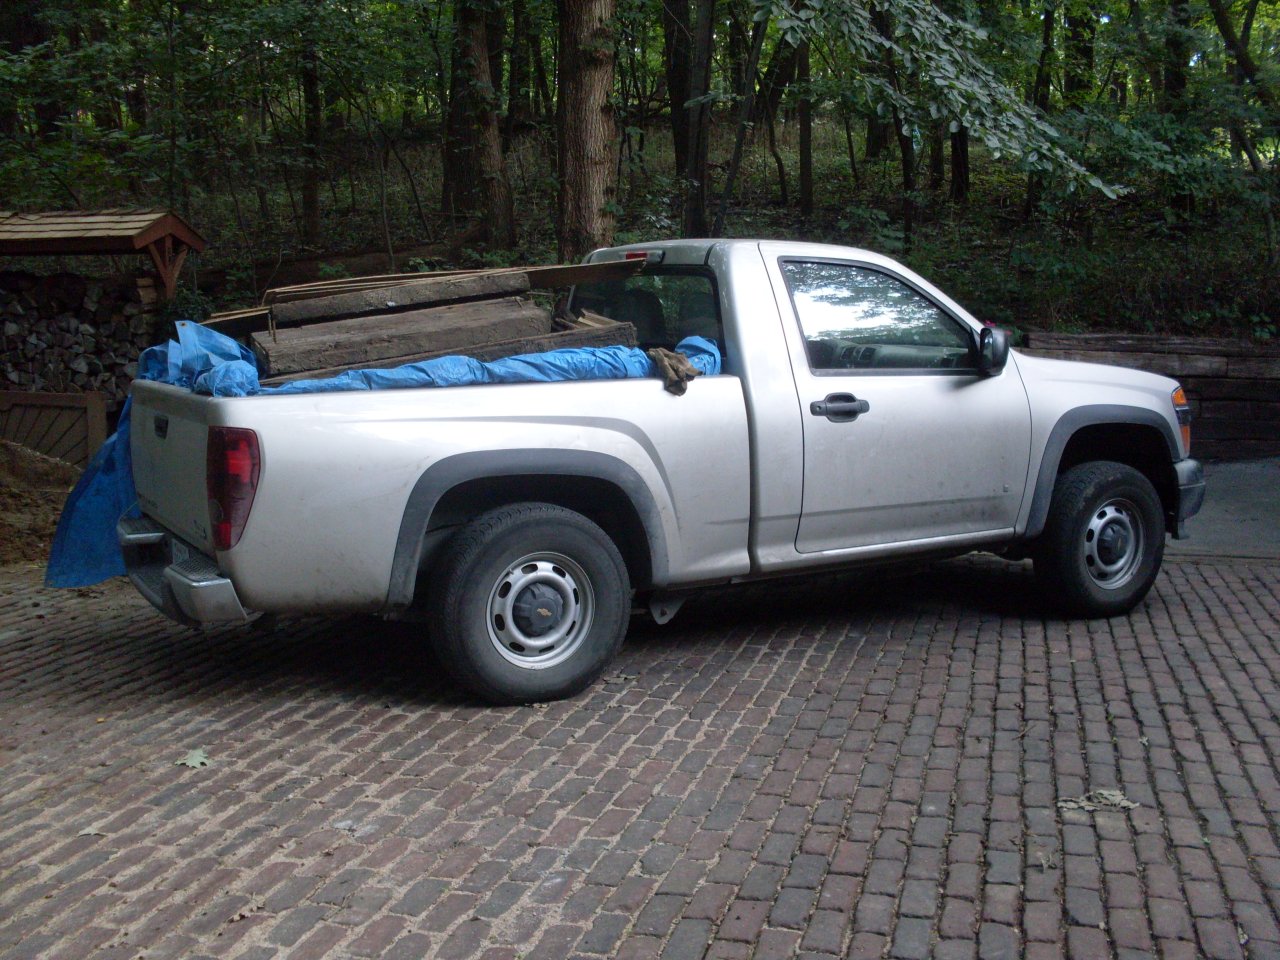
The
project to this point generated an amazing volume of debris.
Probably 40 railroad ties, or what was left of them, concrete,
broken blocks and bricks. This was one of four or five trips to
the dump totaling nearly 6000 pounds.
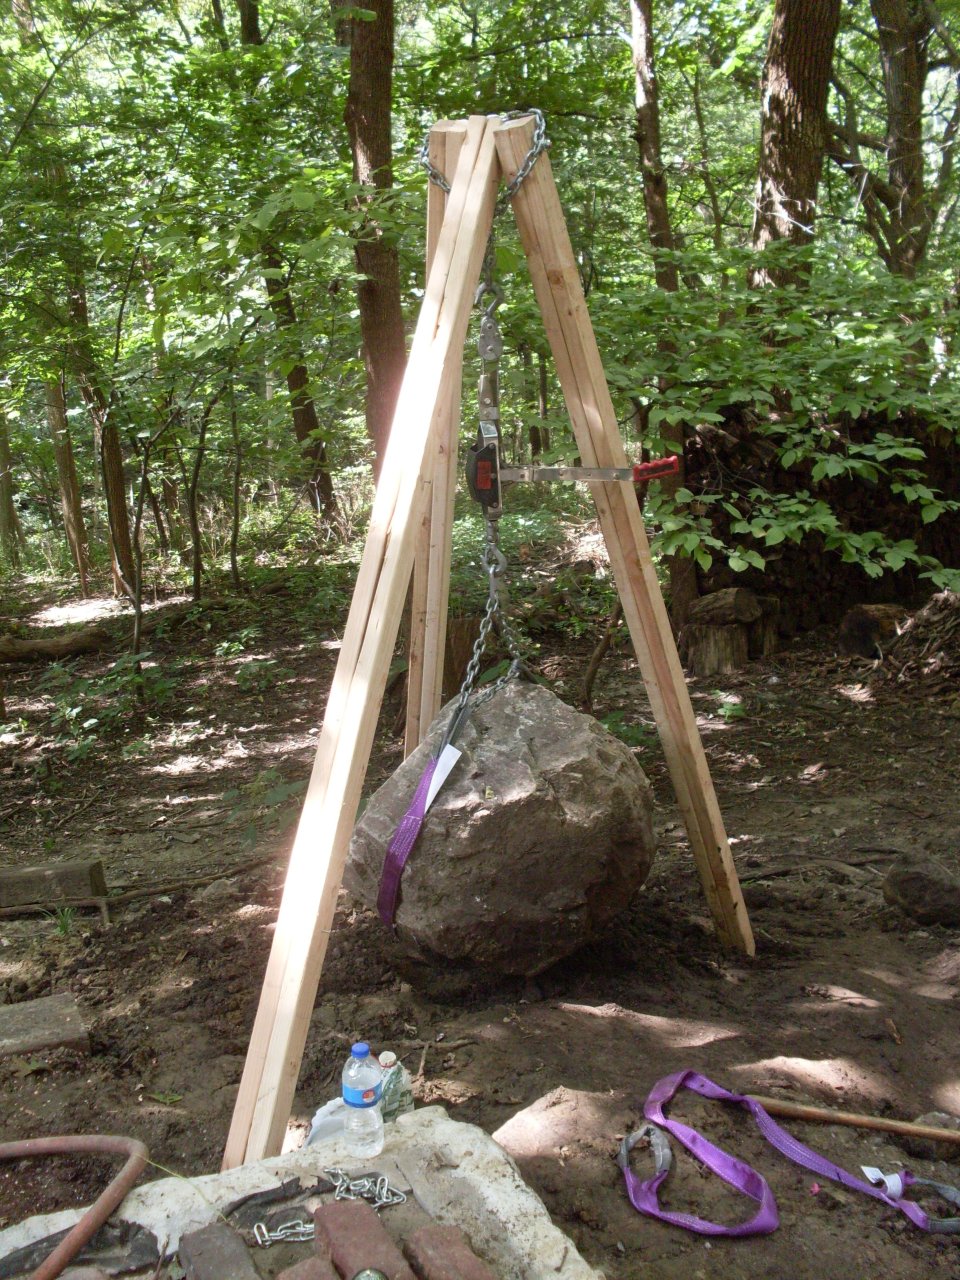
One
small footnote to my summer assignment was a casual, "Oh, and while you're out
there, Sweetie, could you move my pink rock back up where it belongs?"
The
pink rock was an 1100-pound "feature" we brought in years ago to be the
centerpiece of a small garden area. It has slowly been sinking and
moving down a slope over the years. It needed to be lifted and
drug about three feet up the slope. This purpose-built tripod did
the trick. Obviously, I didn't get under or downhill from the rock when it
was suspended.
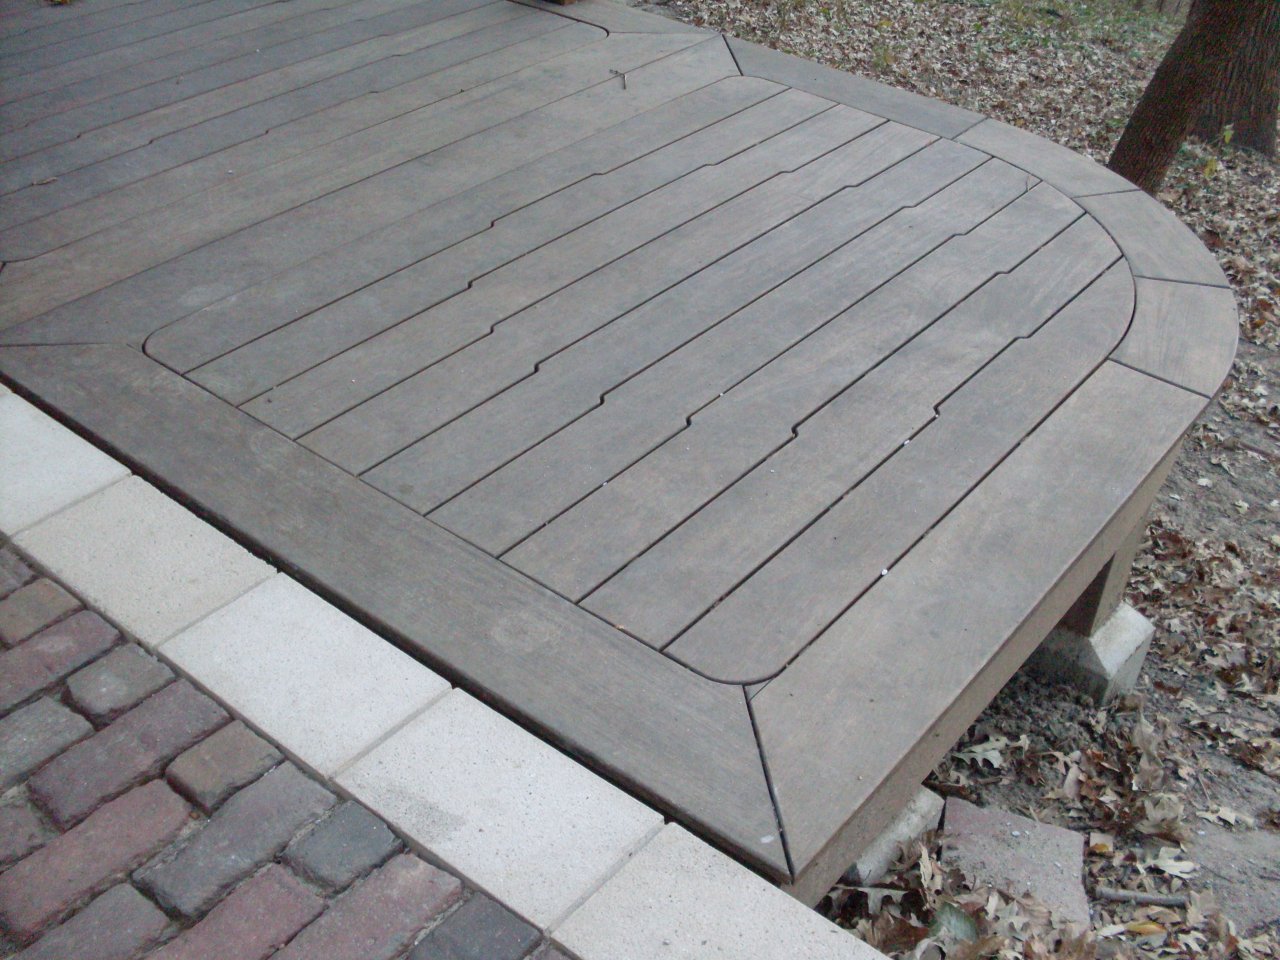
Now
that the wall itself was done. I had to decide what to cap it with.
I'd always sort of thought that a soldier course of brick would
be it, and that's what I based the wall height on. I was never
really excited about the look in my mind's eye, though. Then one
day our friend Peggy the Designer was over. It was a social visit, not
a professional one, but we were outside talking about the progress on
the project, and she casually asked what was going on top of the wall.
"Soldier course of brick, I guess," I said. "But you
already have a lot of brick," she blurted, inadvertently giving us some free design advice. Well, that totally
ruined the idea of a brick cap for me, not that I was really in love
with it anyway.
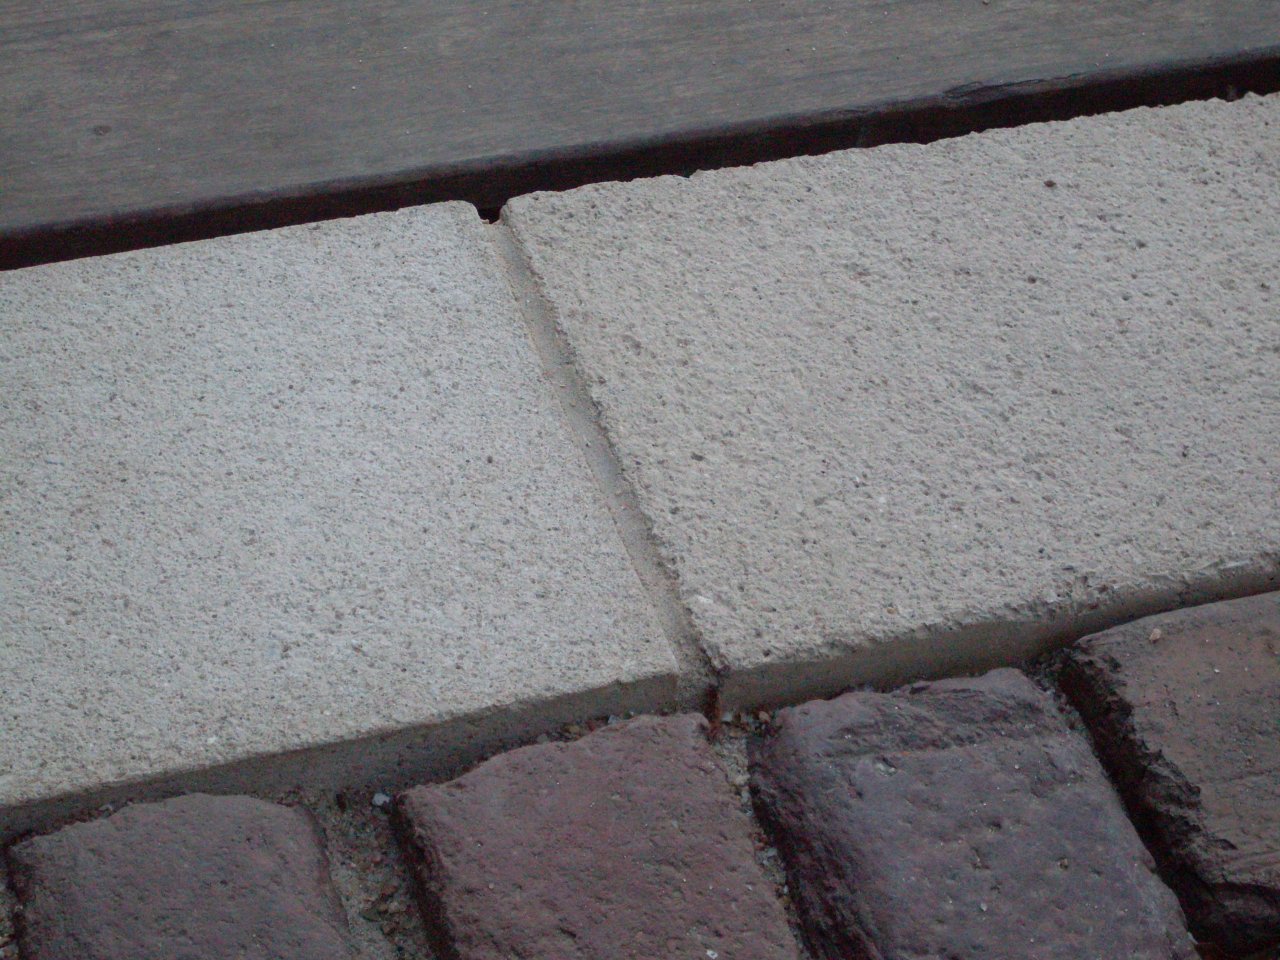
I
then had to come up with something else,
hopefully something that excited me. I made it a point to notice
wall caps as I drove around town. A few days later, I noticed a
brick wall with a natural limestone cap. "Of course," I said,
"It's a traditional use of a natural material, a nice contrast of
textures and earthy colors. Why didn't I think of that before?"
I
called all of the logical local stone suppliers, and found that few of
them carried much of a selection of natural stone. The few who
did didn't stock anything in a standard size I could use. Two
places offered to cut pieces to size for me, but they quoted it at
around $25 per lineal foot. I considered this a little rich for this
project, which would eventually total nearly 100 feet, and I hadn't
even mentioned the curved pieces to them.
In
my desperation, I turned where many people turn to when faced
with a dismal dead end: Google. In my cybersearches, I
occasionally but repeatedly came across curious terms like "cast
limestone", "reconstituted limestone", and "limestone concrete".
I spent an inordinate amount of time reading fascinating articles
by scientists claiming that the pyramids of Egypt were at least
partially made from cast, and not hewn limestone blocks. The cast
and carved blocks could not be distinguished except by microscopic and
chemical analysis. Believing that I might have as many or more
resources at my disposal than the ancient Egyptians, I pursued this
path. I eventually came across a French website where a guy talks
about restoring and repairing old limestone structures with cast
limestone. He offered a manual, and I bought it.
The manual was a sometimes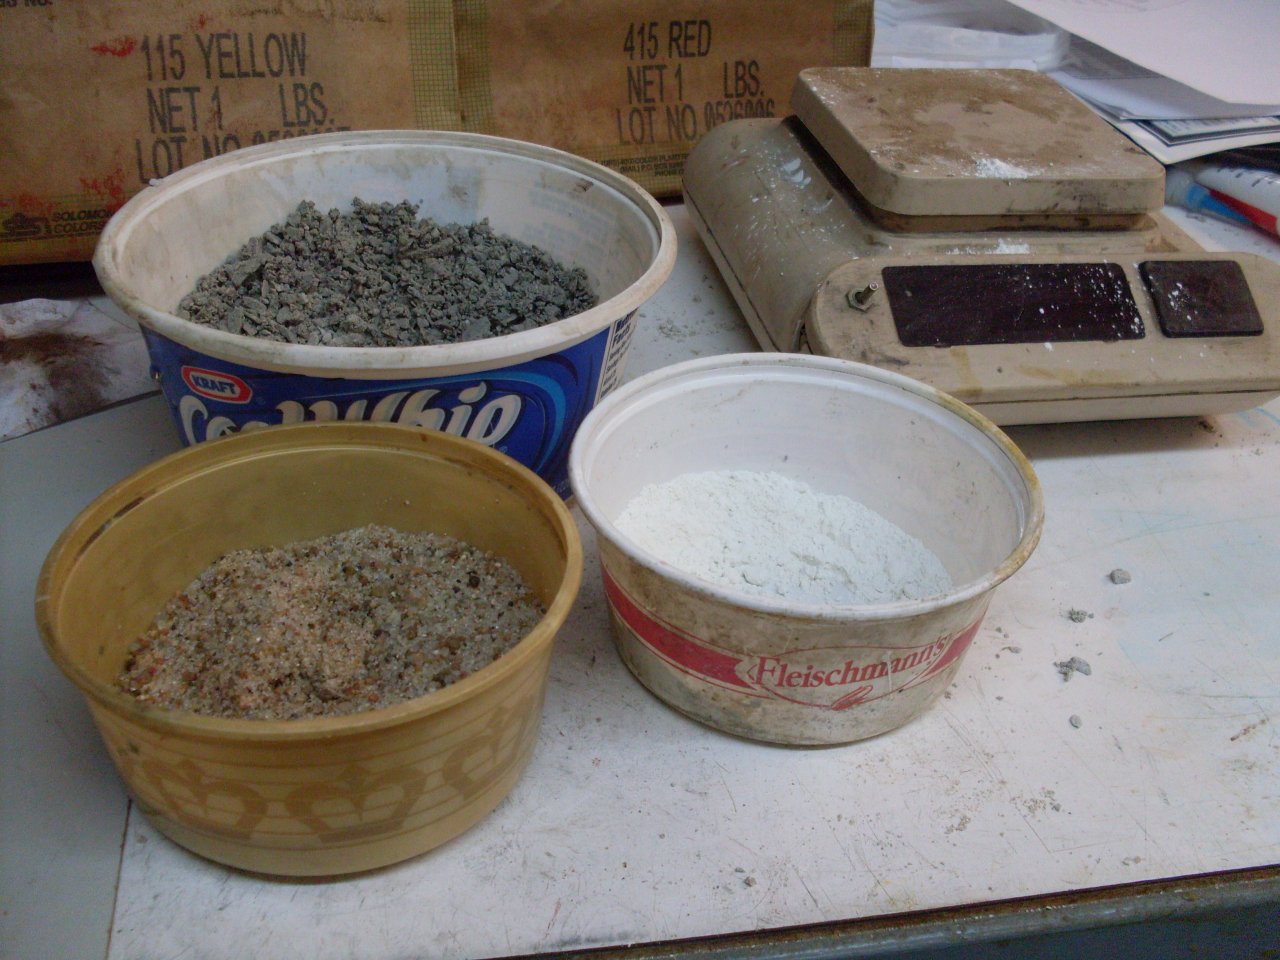 awkward, but passable English translation from the original French.
It described a number of materials and processes in making a
"reconstituted" limestone. Reconstitute
awkward, but passable English translation from the original French.
It described a number of materials and processes in making a
"reconstituted" limestone. Reconstitute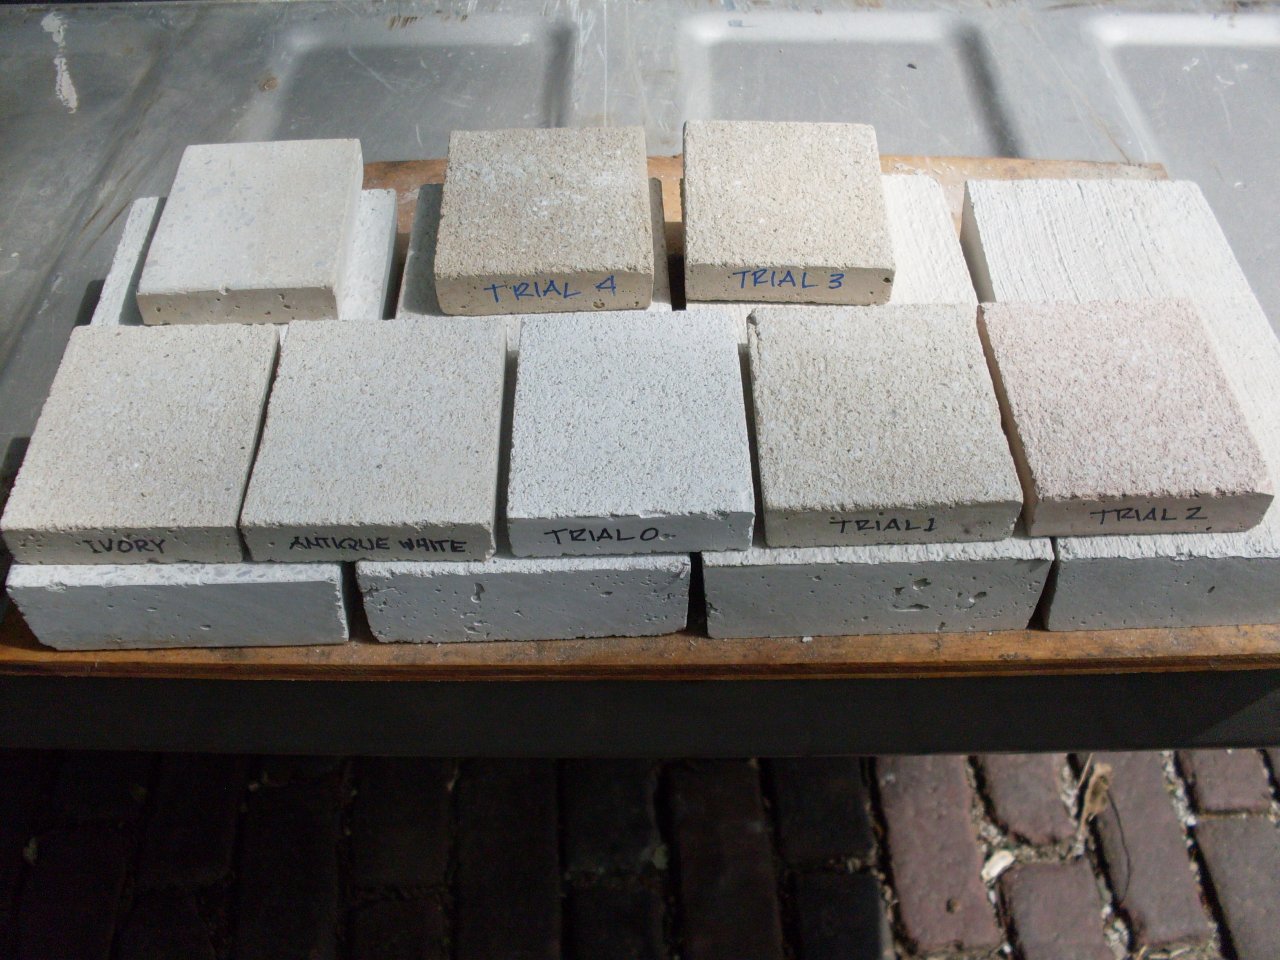 d seems to be an apt term, since just about all of the ingredients either are limestone, or
are derived from it. Some of he very good
pictures
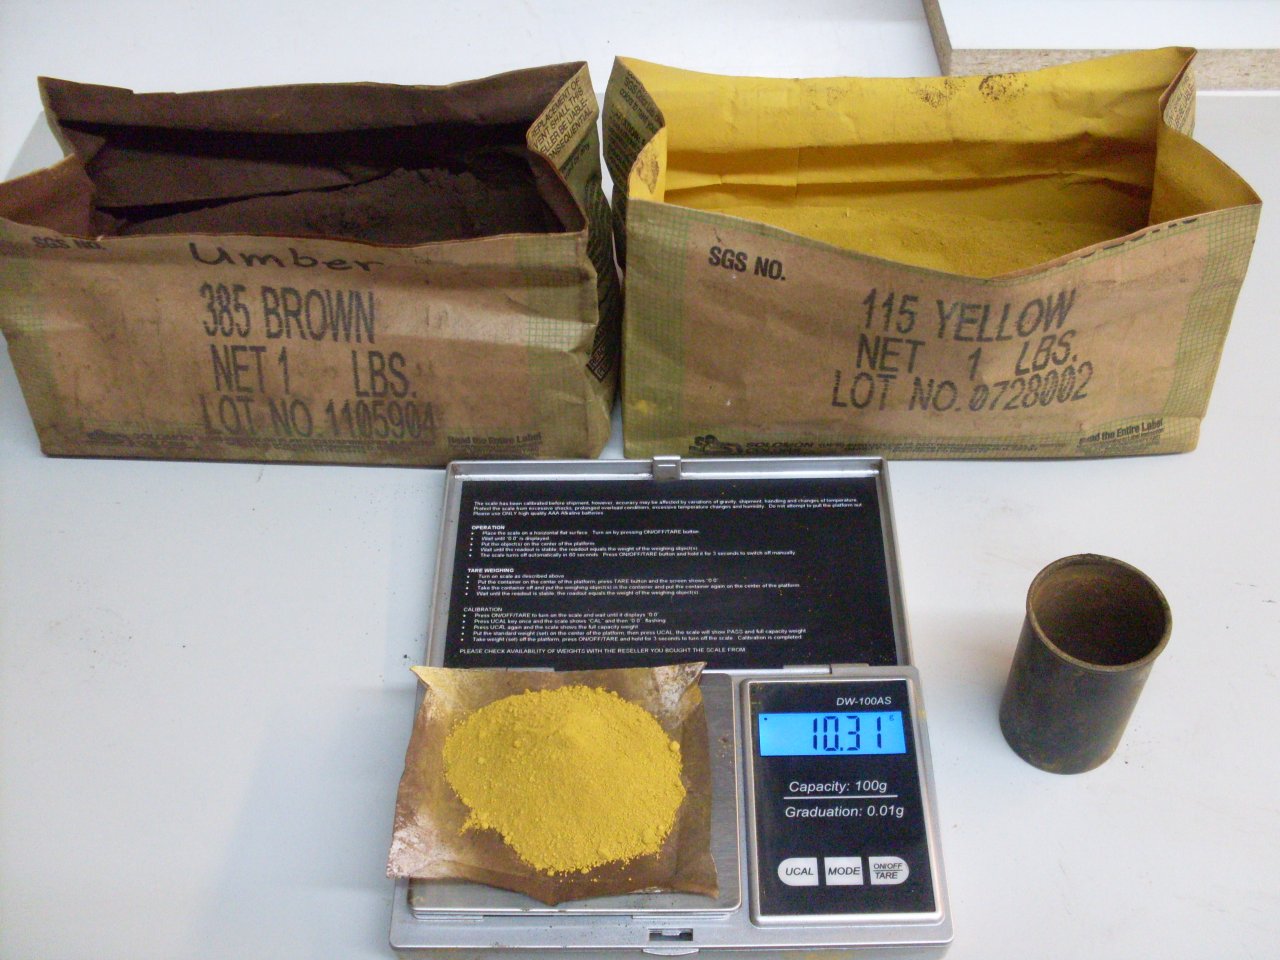
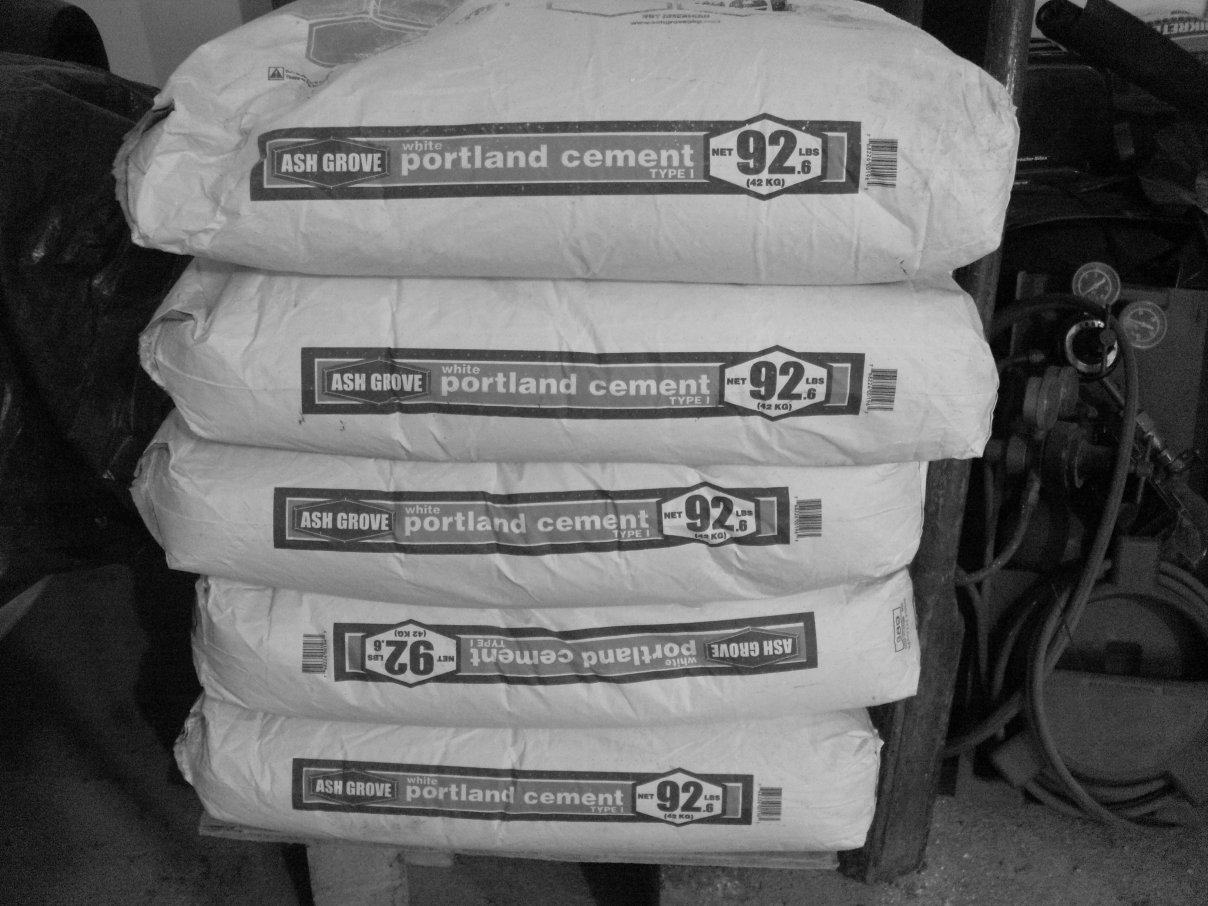
in the manual showed exactly the look I wanted. The
basic recipe includes white Portland cement and finely crushed
limestone with a lot of limestone sand and dust still mixed in.
(They call it "dirty" in the trade.) I played around
with variations on this basic
mix, pouring small samples for each, and came up a texture and color I
was happy with. My final mix included some sand for a slightly
speckled look. Also, the limestone available locally is very
light gray, so I added some concrete colors to get the buff color I was
after. "Trial 3" in the accompanying picture is the final mix I
went with.
d seems to be an apt term, since just about all of the ingredients either are limestone, or
are derived from it. Some of he very good
pictures
in the manual showed exactly the look I wanted. The
basic recipe includes white Portland cement and finely crushed
limestone with a lot of limestone sand and dust still mixed in.
(They call it "dirty" in the trade.) I played around
with variations on this basic
mix, pouring small samples for each, and came up a texture and color I
was happy with. My final mix included some sand for a slightly
speckled look. Also, the limestone available locally is very
light gray, so I added some concrete colors to get the buff color I was
after. "Trial 3" in the accompanying picture is the final mix I
went with.
 Crushed limestone, at least around here, is only available from a quarry
in bulk. It can be a little intimidating to drive into a working
quarry with enormous trucks, loaders, and other
equipment everywhere, driving a little half-ton pickup truck that
barely registers on their scale. A pickup load is a very small order for them, less than
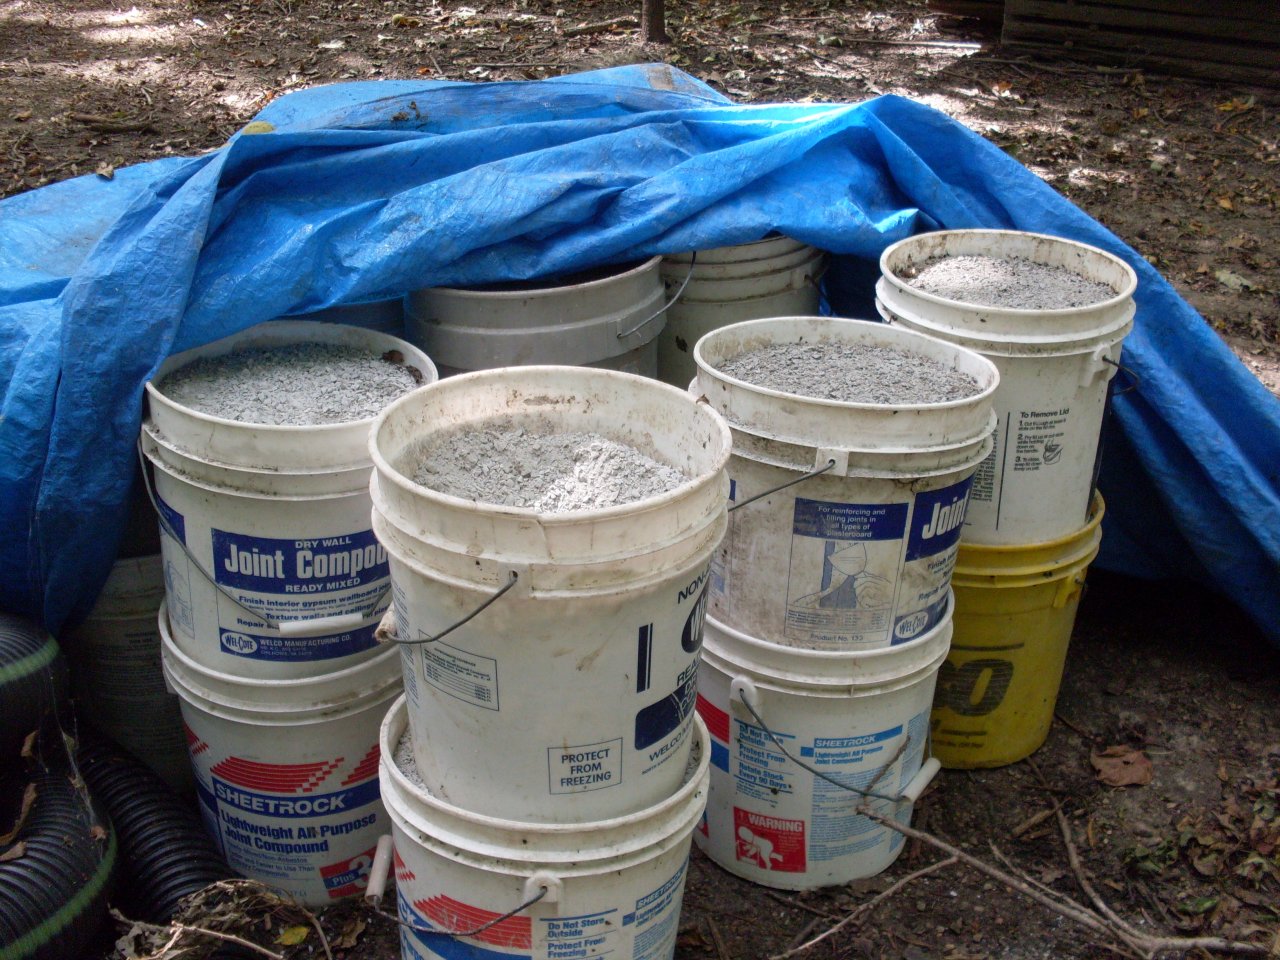
a $10 sale, but they did accommodate me. Also, nothing screamed amateur more than the fact that I filled the bed of my
pickup with empty 5-gallon mud buckets so unloading would be easier.
Crushed limestone, at least around here, is only available from a quarry
in bulk. It can be a little intimidating to drive into a working
quarry with enormous trucks, loaders, and other
equipment everywhere, driving a little half-ton pickup truck that
barely registers on their scale. A pickup load is a very small order for them, less than
a $10 sale, but they did accommodate me. Also, nothing screamed amateur more than the fact that I filled the bed of my
pickup with empty 5-gallon mud buckets so unloading would be easier.
The
loader operator deftly dipped the corner of his bucket into a mountain
of crushed stone, swung around, and gingerly let it slide into the bed
of my truck, which promptly squatted down to its spring bumpers.
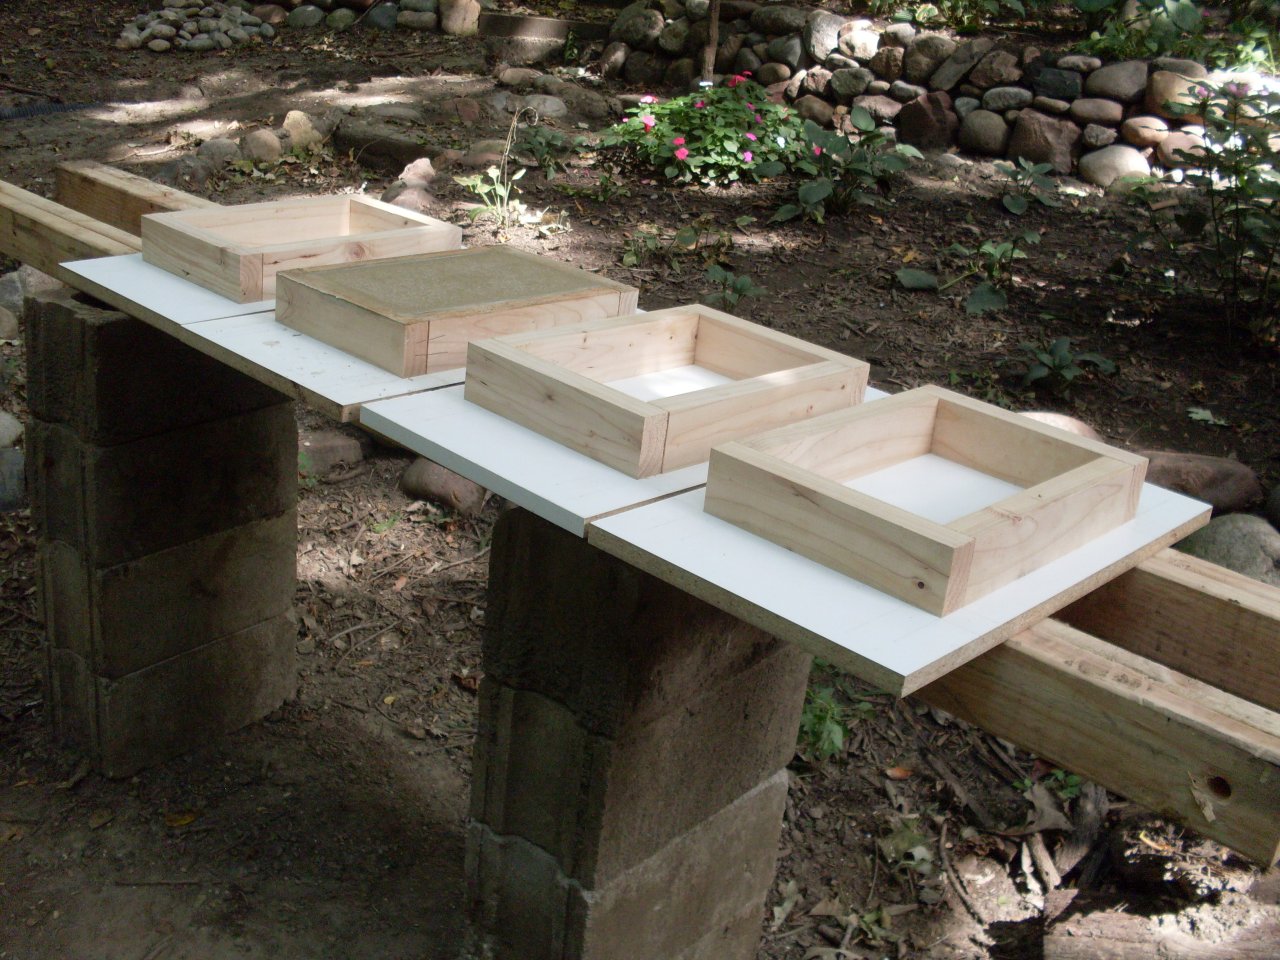
I
made simple molds, four for the rectangular blocks, and four for the
curved segment ones. To start out, I mixed and poured the molds
one at a time, so I could get the amounts right and work out kinks in
my process without 100 pounds of wet mix waiting on me. By the
time I thought it was right, I had it down to such a rote thing, I just
continued to do all of them individually.
After
filling the mold with fairly stiff mix, I vibrated manually it to
settle it and reduce the number of voids. Small air pockets are
not a serious problem, since I wanted a rough surface texture anyway.
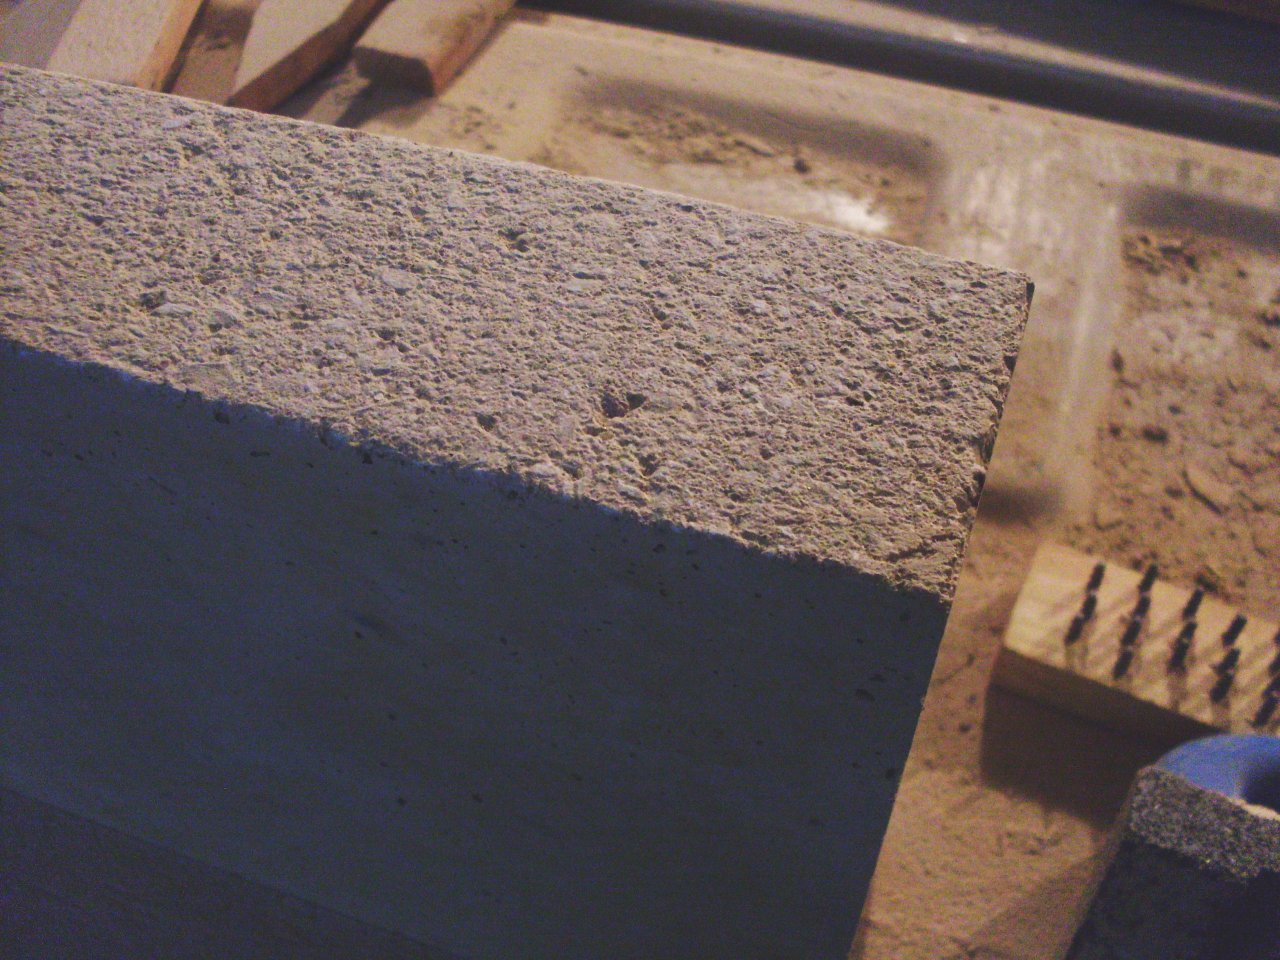
 Getting the right finish texture takes some practice. The way I do the molds, the blocks come out with
a sheen on t
Getting the right finish texture takes some practice. The way I do the molds, the blocks come out with
a sheen on t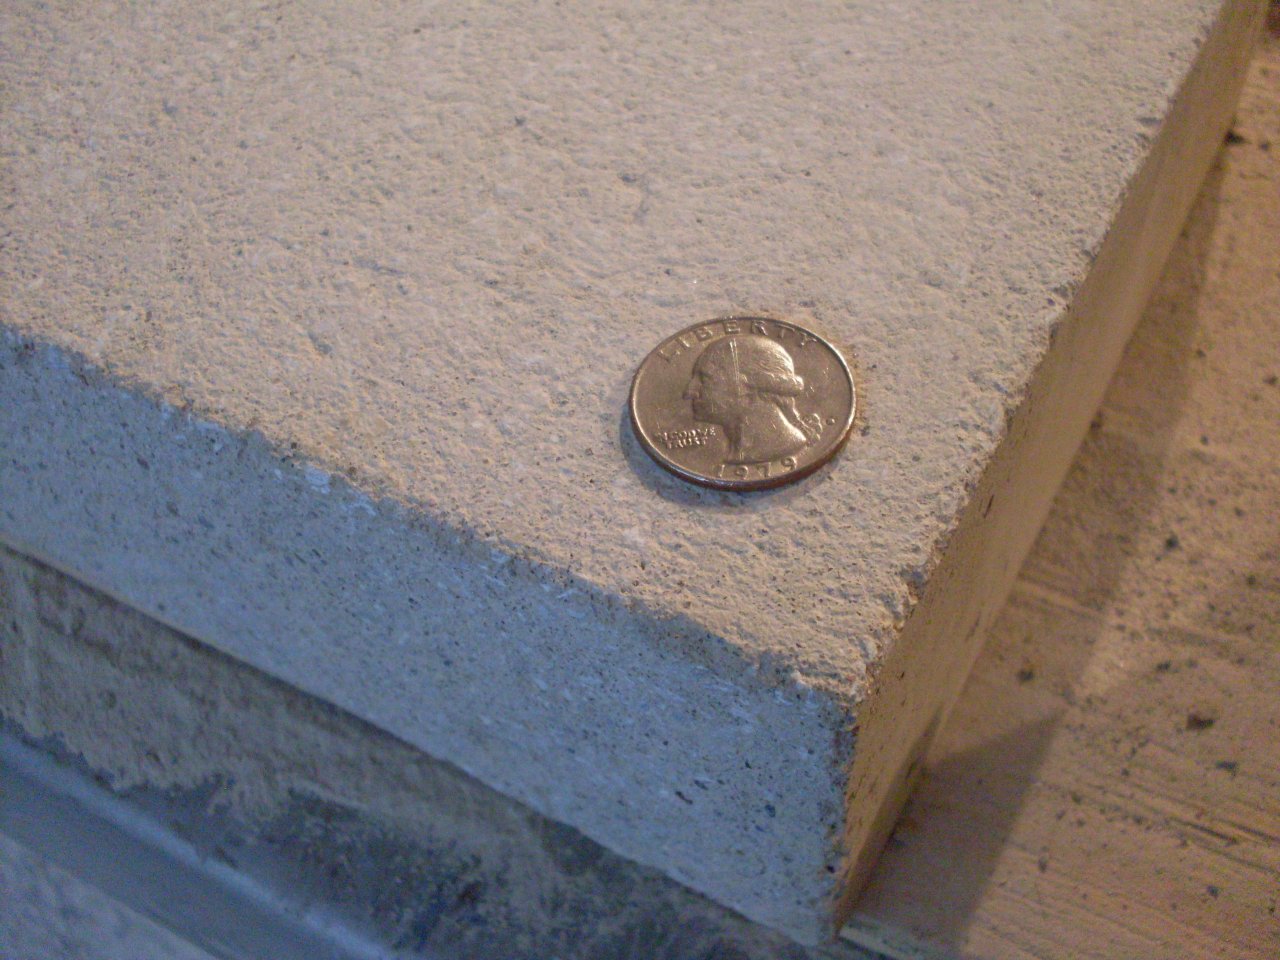 he top troweled surface. It's this top surface that I finish
as the final exposed surface. The process is one of careful
abrasion that removes the sheen and some of the fines,
leaving a texture that depends on a lot of things. I do the
texturing when the block is still somewhat soft, maybe eight to ten
hours after pouring, depending on temperature. A lot of material
can be removed pretty quickly, so careful tracking of progress is
necessary. Abrasion can be done with sandpaper, special masonry
abrasive stones, or with stone mason's tools called a "French drag" or
an "English drag". These terms can be Googled to see what they look like.
he top troweled surface. It's this top surface that I finish
as the final exposed surface. The process is one of careful
abrasion that removes the sheen and some of the fines,
leaving a texture that depends on a lot of things. I do the
texturing when the block is still somewhat soft, maybe eight to ten
hours after pouring, depending on temperature. A lot of material
can be removed pretty quickly, so careful tracking of progress is
necessary. Abrasion can be done with sandpaper, special masonry
abrasive stones, or with stone mason's tools called a "French drag" or
an "English drag". These terms can be Googled to see what they look like.
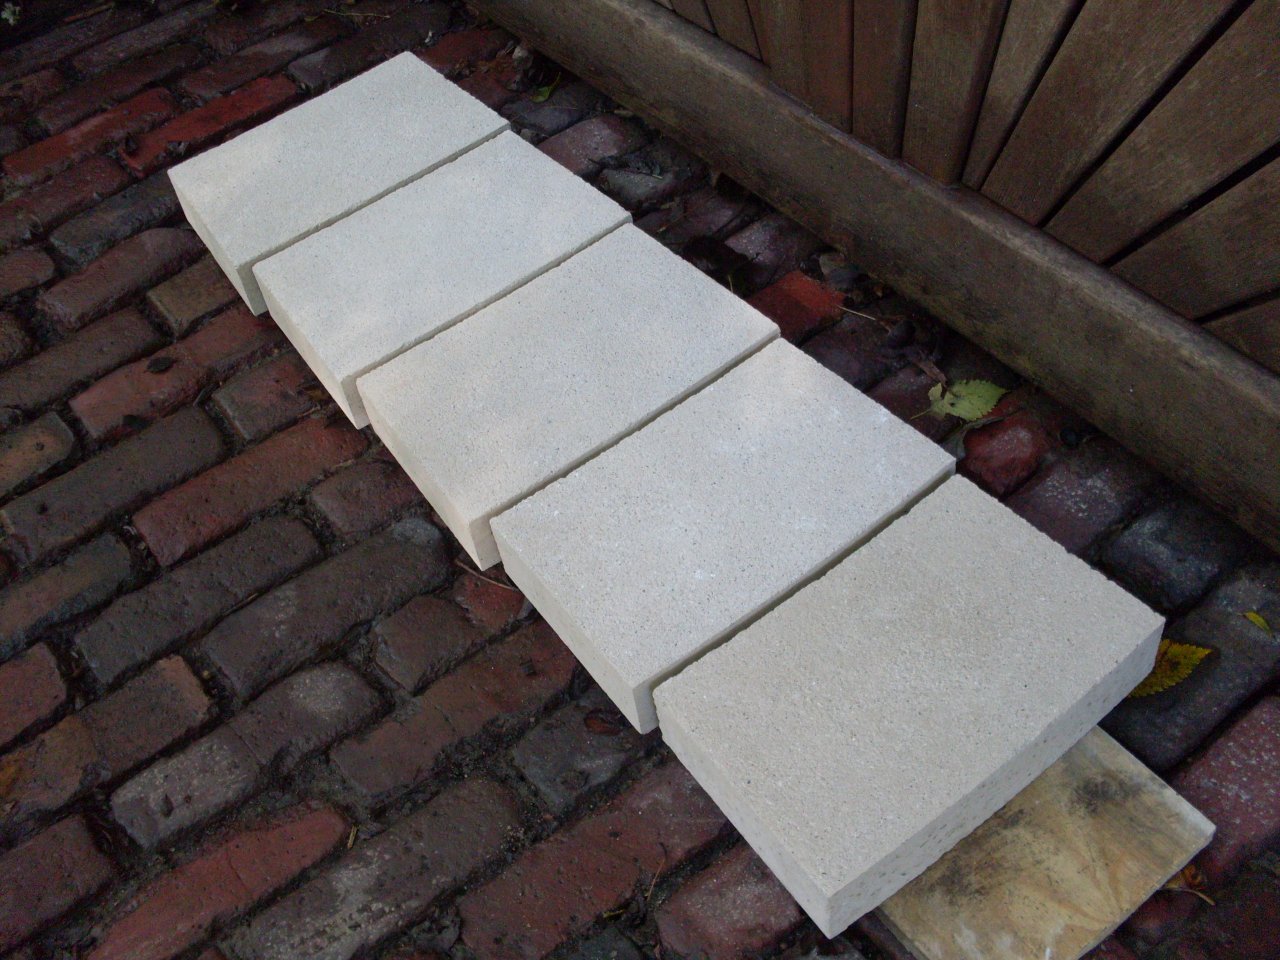 I had to make 60 of the blocks including 14 curved ones. The curved segme
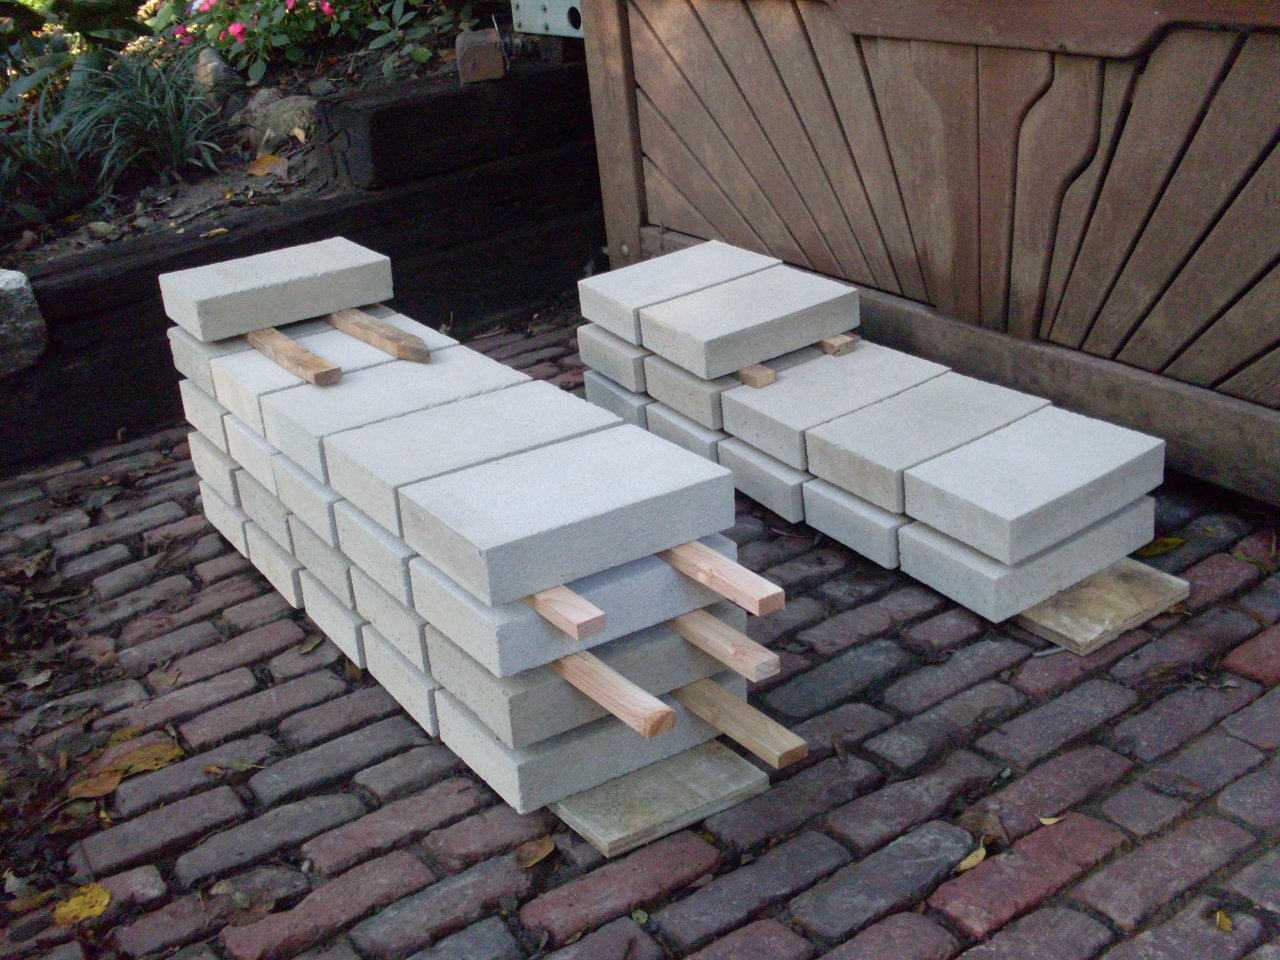 nts
were sized so that they were the same length as the straight ones to
give some visual continuity. This dictated that each block
covered a little over six degrees of arc. The
curve seems subtle, but together, they make a 90 degree turn.
I sized and laid out the blocks so that there would be no cuts
except at the far end. This meant that there wouldn't be a joint
at the beginning of the curve. I had to make one special block
that was part straight, and then had the beginning of the curve.
Luckily, the other end of the curve came out very close to a
natural joint.
nts
were sized so that they were the same length as the straight ones to
give some visual continuity. This dictated that each block
covered a little over six degrees of arc. The
curve seems subtle, but together, they make a 90 degree turn.
I sized and laid out the blocks so that there would be no cuts
except at the far end. This meant that there wouldn't be a joint
at the beginning of the curve. I had to make one special block
that was part straight, and then had the beginning of the curve.
Luckily, the other end of the curve came out very close to a
natural joint.
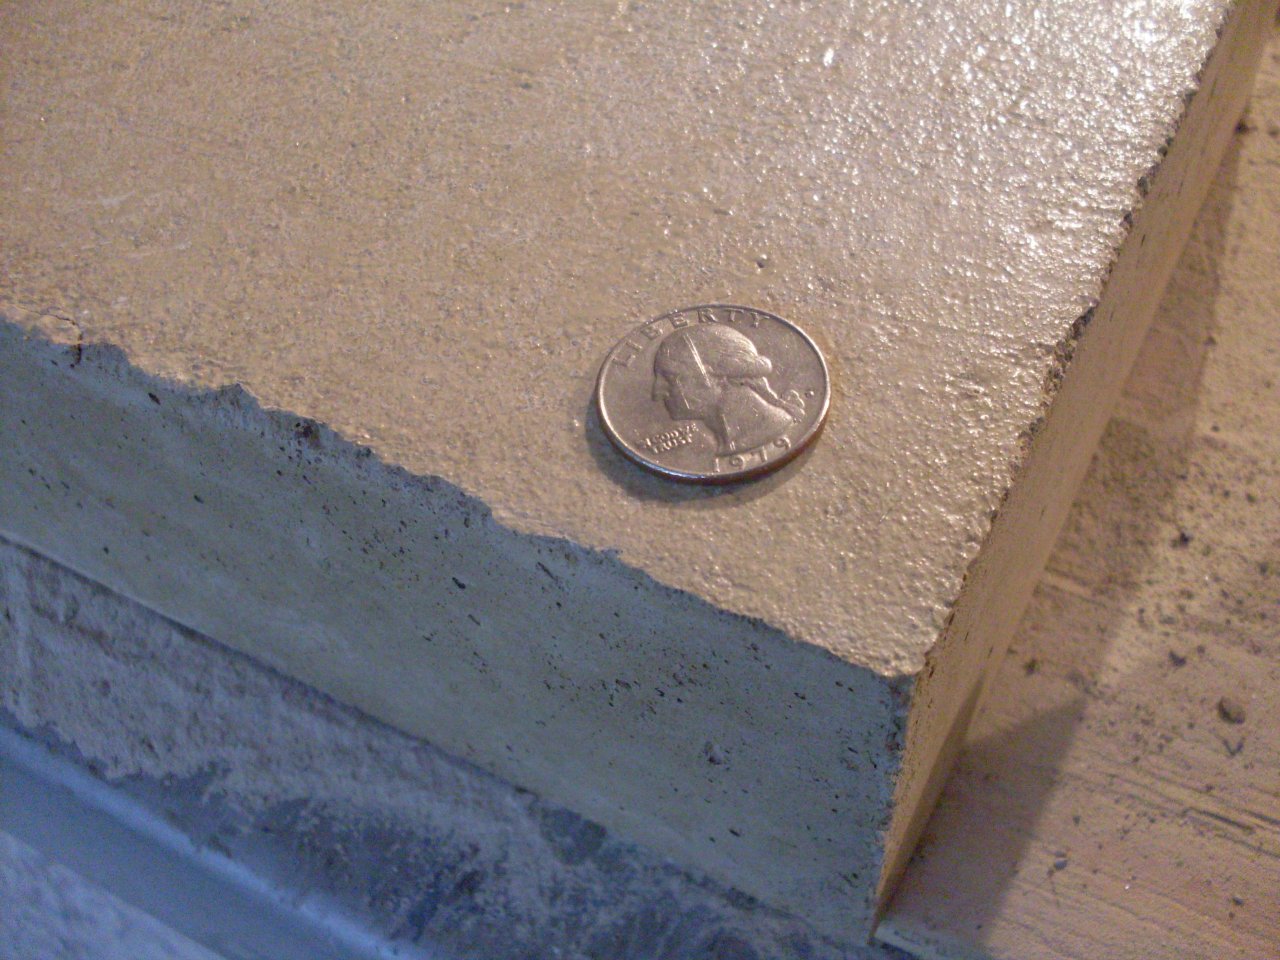
It took two days to set and
grout the blocks. They were set in standard mason's mortar, but
the grout, which would be seen, was mixed up from white Portland,
hydraulic lime, silica and regular sand, and some color. I had to
experiment with the coloring for the grout to get a decent match.
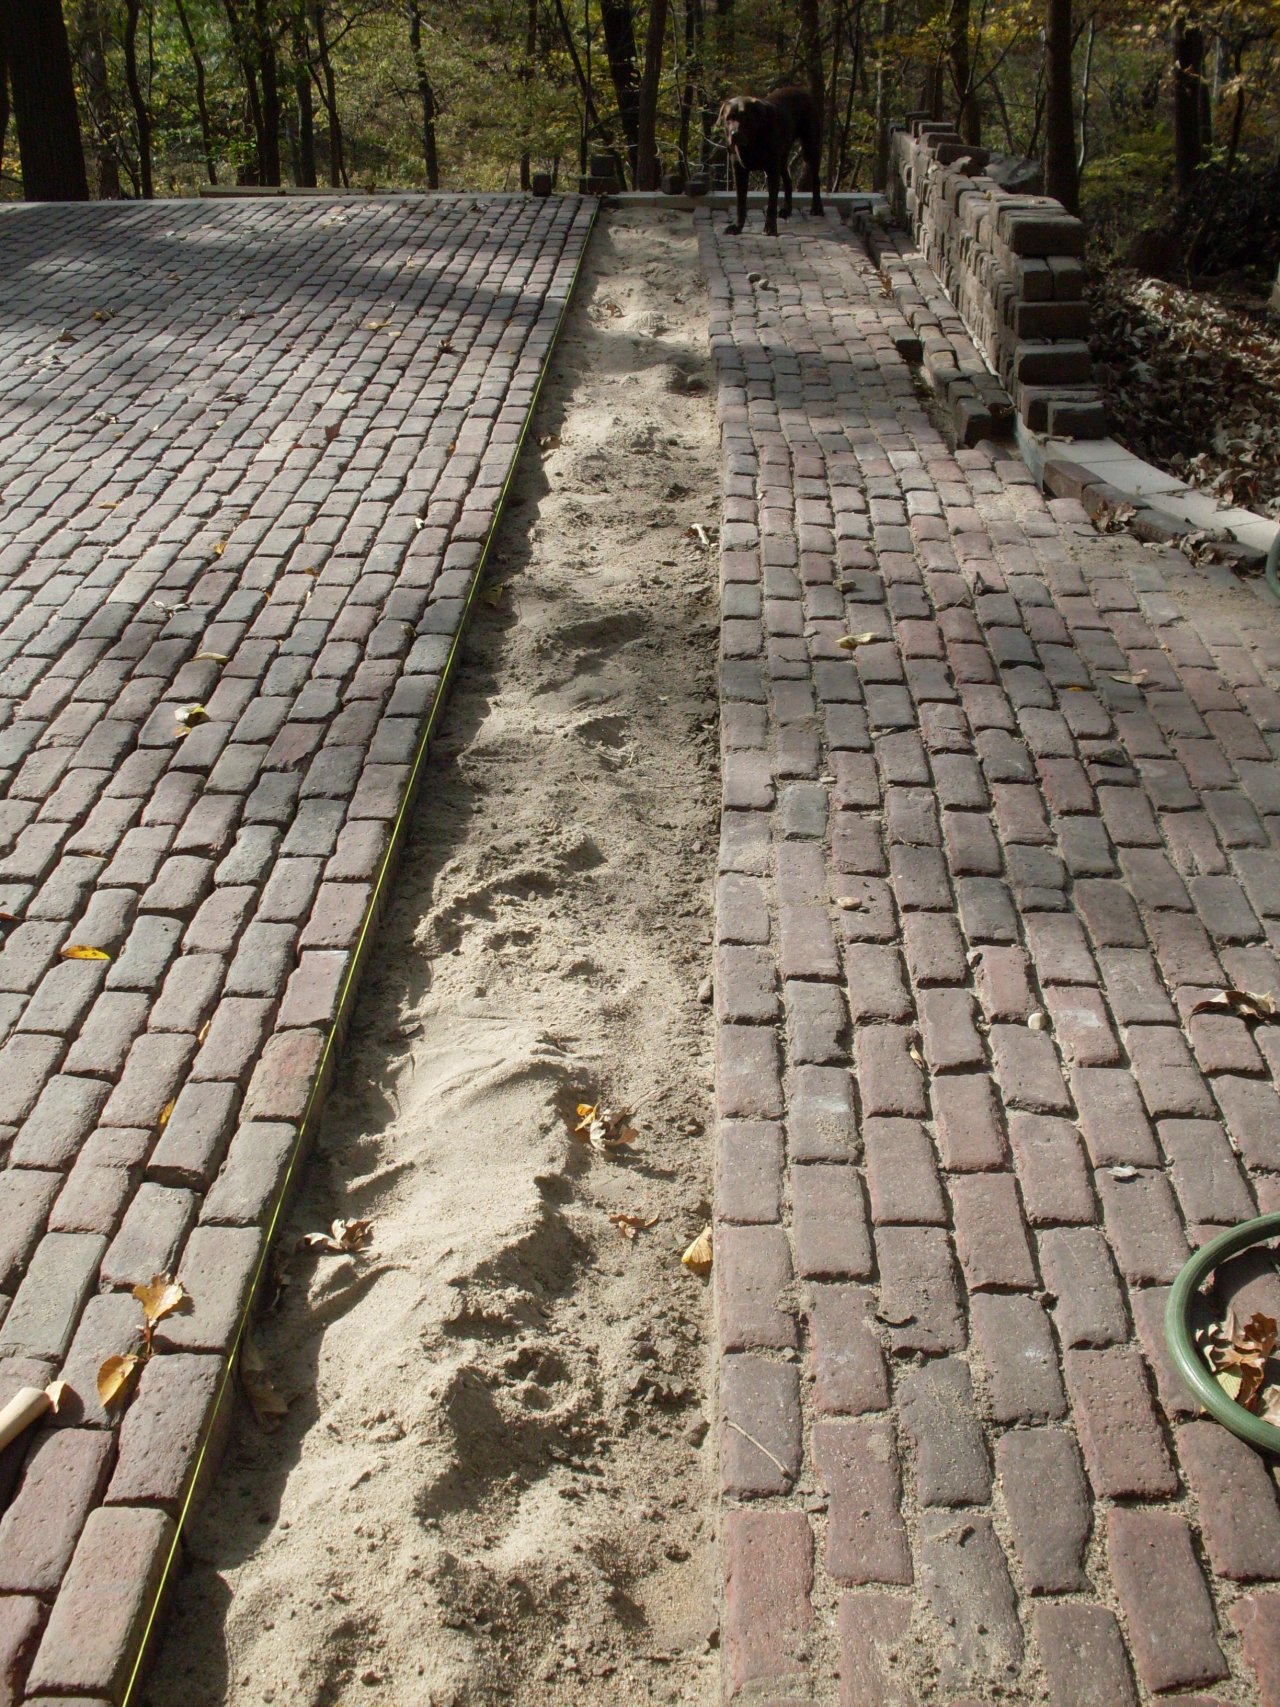
I
spent most of October resetting all of the
4500 paving bricks, since during construction of the wall, the many
rains washed out the sand bed under them, leaving them pretty wavy. It
took another seven tons of sand to get everything lined up again.
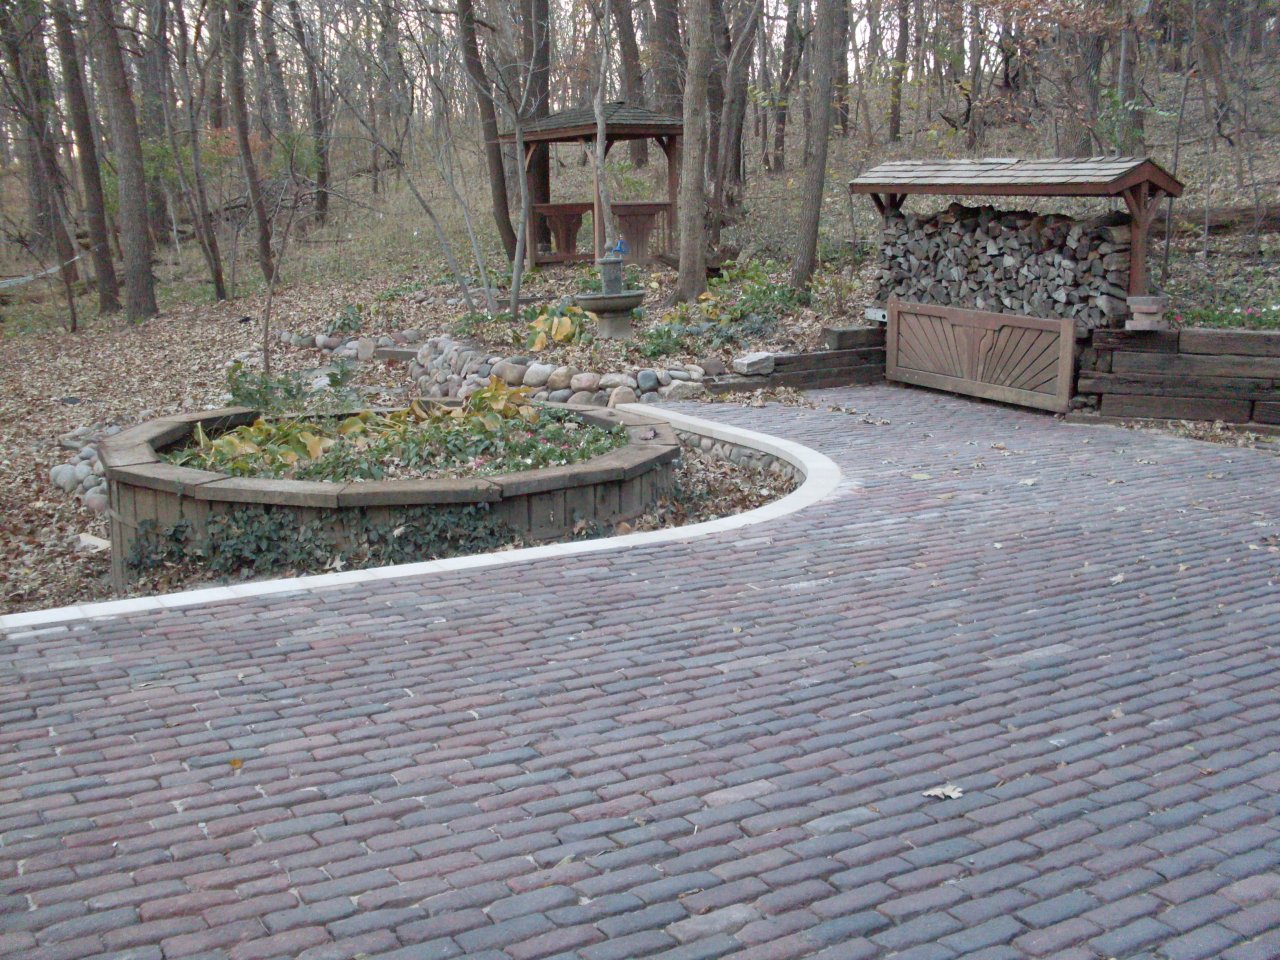
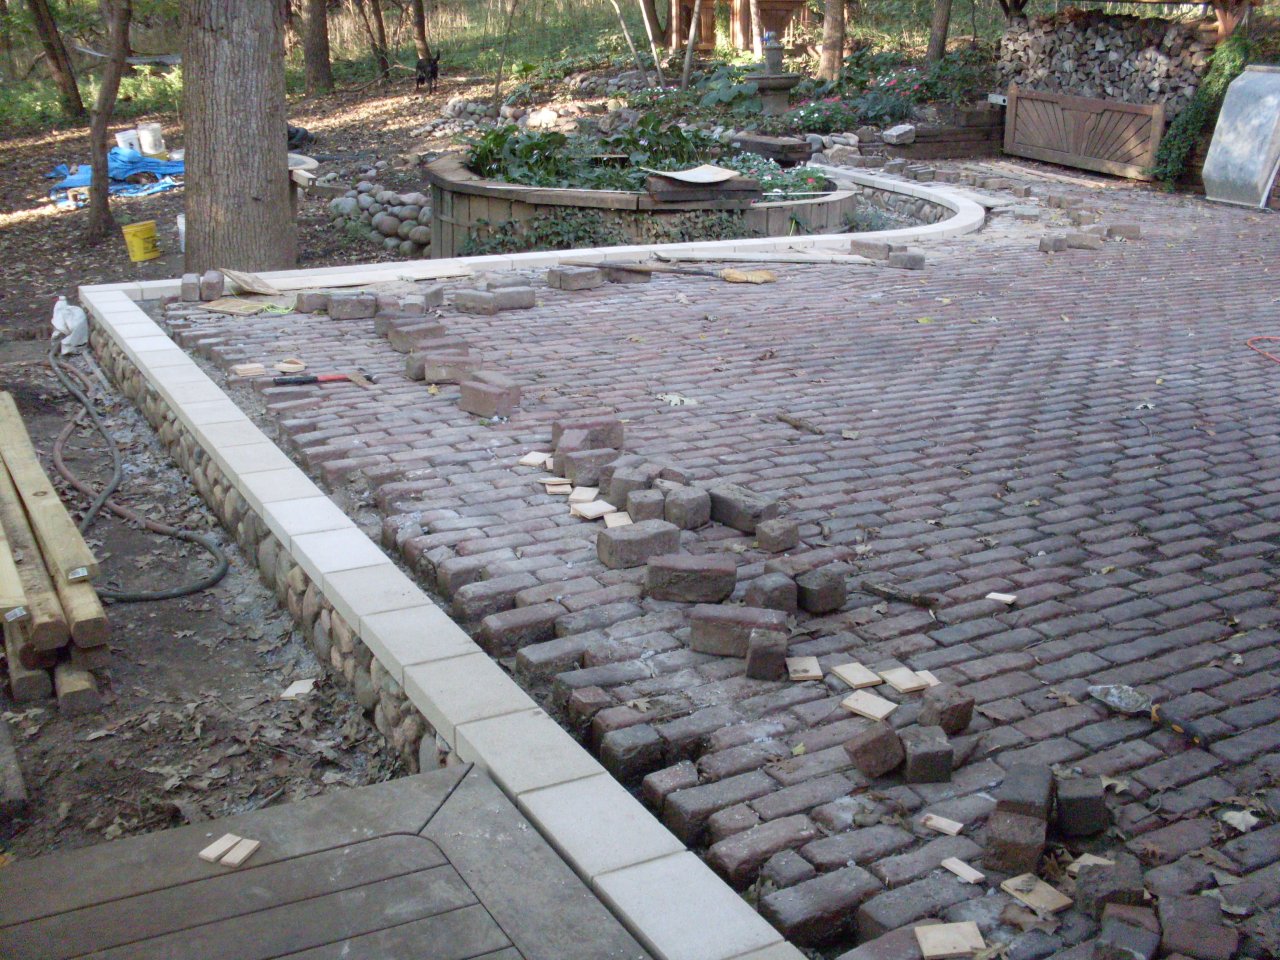
So
here is the project in mid November. It's buttoned up and shut
down for the winter. I think I'm happy with the way it turned
out, especially the contrast of the cast limestone as a transition
between the paving brick and the wood deck.